Ever wondered how to cook duck? It's much simpler than most people think. This Roast Duck has tender and juicy meat, crispy skin, and it's glazed with the honey-balsamic glaze to give the duck a beautiful roasted look. Perfect holiday main dish recipe or something you can make any time for a special occasion.
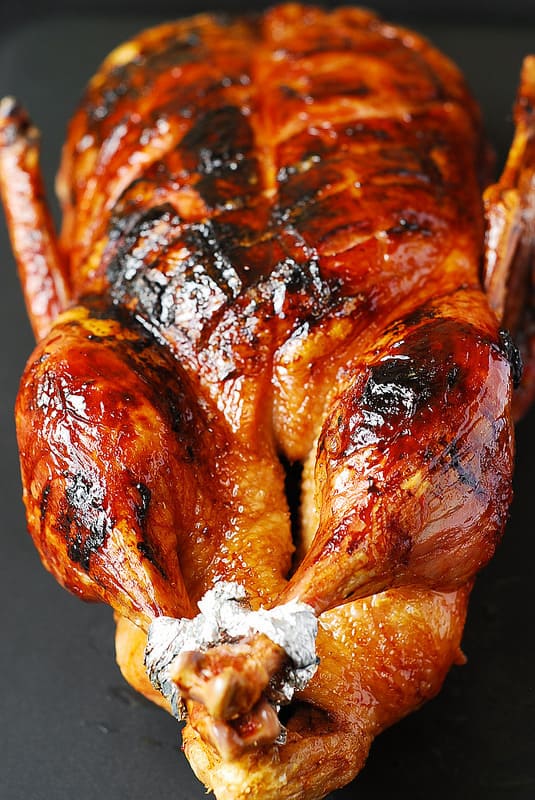
It's a great-looking dish - perfect for any special occasion, and with the holidays coming up, this roast duck will look great on any Thanksgiving menu (my 50 best Thanksgiving recipes), or as a Christmas and New Year's Eve dinner idea. By the way, the honey-balsamic glaze in this recipe DOES NOT MAKE THE DUCK SWEET - I did not want a sweet duck. It only gives a nice crispiness and beautiful look to the duck skin. Your duck will have a very savory and juicy flavor from the garlic and lemon that you'll stuff inside the duck cavity. SO GOOD! Cooking this duck does take some time and effort, which makes it a perfect holiday main dish or a special occasion dinner.
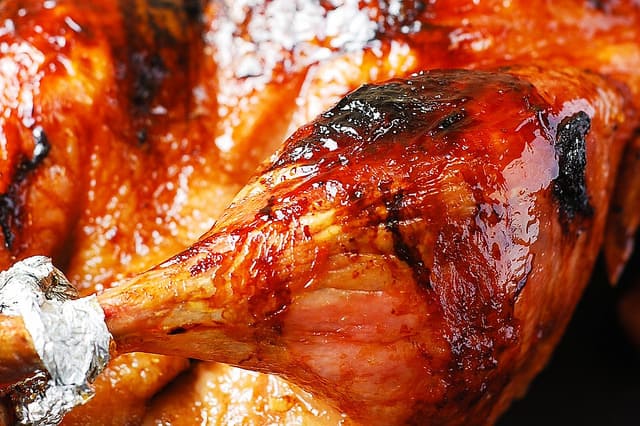
This recipe has very detailed instructions (with step-by-step photos) on how to prepare and cook the duck - which could be very helpful if you've never cooked the duck before. The duck will be roasted in the oven at 350 F for about 3 hours, and in addition to the beautiful duck, you'll end up with a lot of duck fat which I highly recommend you save and use for roasting vegetables, potatoes, and even cooking your breakfast eggs with it!
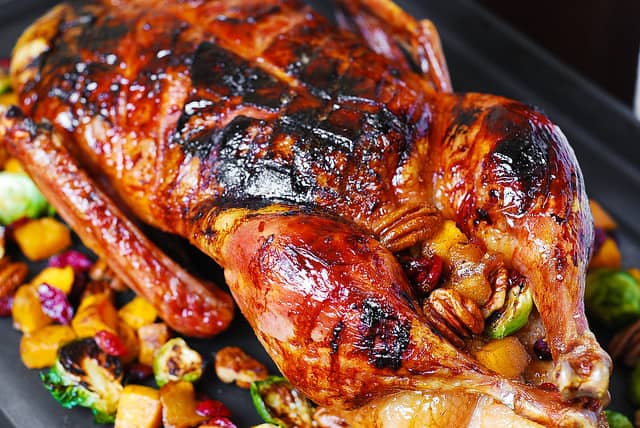
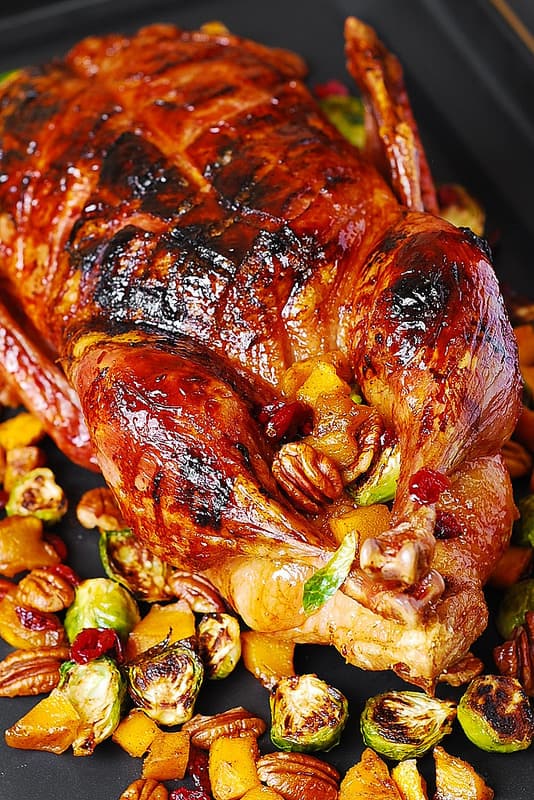
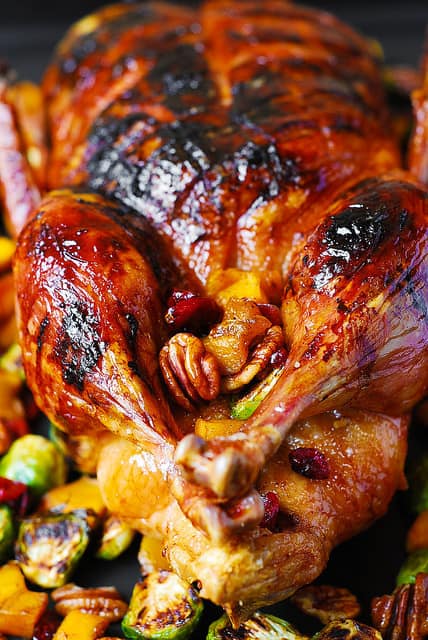
If you want a really beautiful and festive presentation for your holiday duck, use my recipe for Roasted Brussels Sprouts, Butternut Squash glazed with Cinnamon & Maple Syrup, with Pecans & Cranberries as garnish for the duck (this is what you see on the photo below). You can garnish the duck and decorate the serving platter with these colorful veggies - they will have all the holiday colors and flavors and will look very pretty with duck:
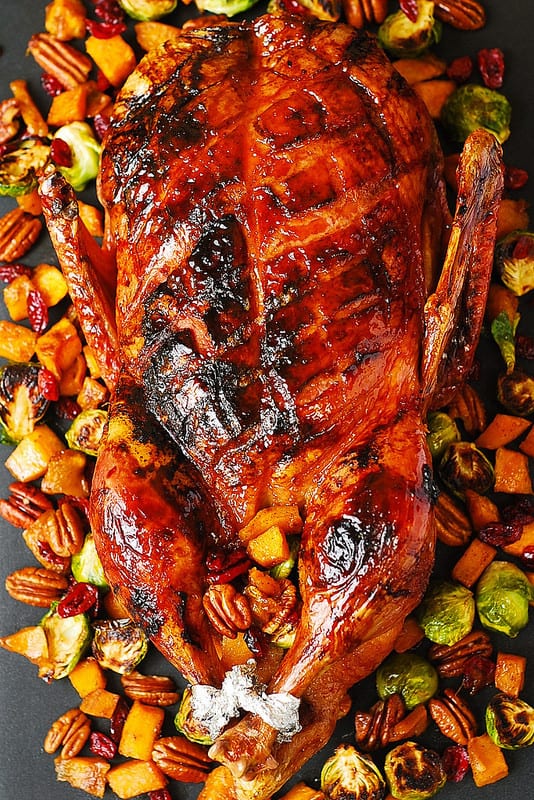
How to prepare a whole duck for roasting
Step-by-step photos and instructions start here (the complete recipe without photos is at the bottom of this post). I recommend that you read and look through these photos and then scroll down to the recipe box itself for more condensed version of the recipe (without photos).
If using frozen duck, make sure it's completely defrosted (defrosted in the refrigerator for a couple of days). Remove the giblets from inside the duck. Rinse the duck, inside and outside, with cold water. Pat dry with paper towels:
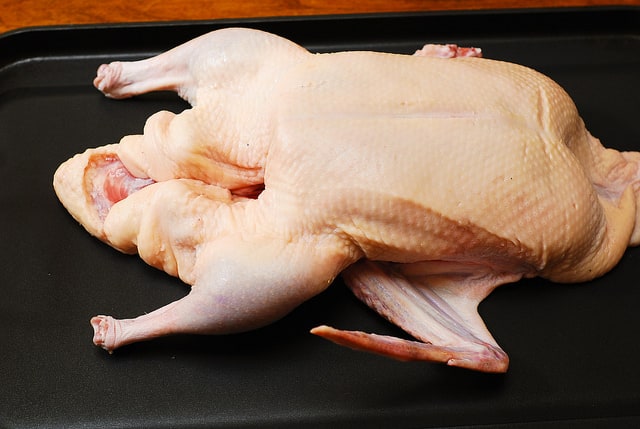
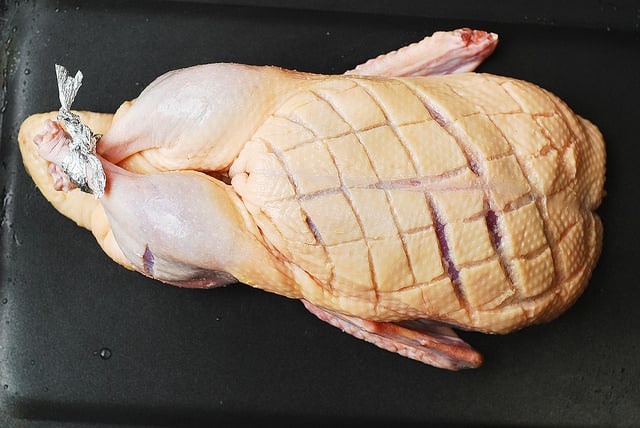
Set the duck on the working surface. Score the duck's skin on the breast side in a diamond pattern, making sure you only cut the skin, without reaching the meat. The 2 deep cuts to the right of the photos is the example of how NOT TO SCORE, but it's still OK, as I did not cut through the meat but did reach the meat in those 2 cuts on the right:
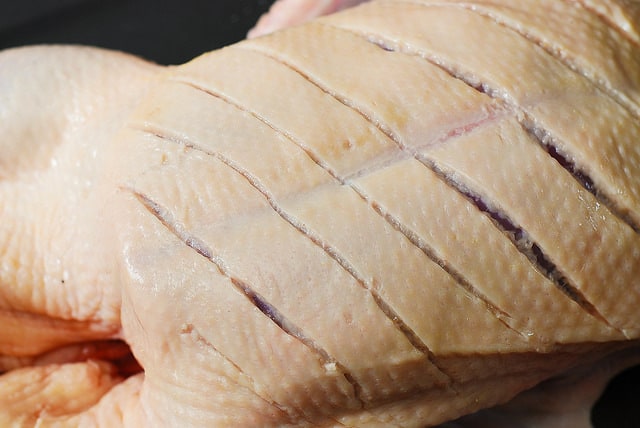
The duck breast should be scored in a diamond pattern:
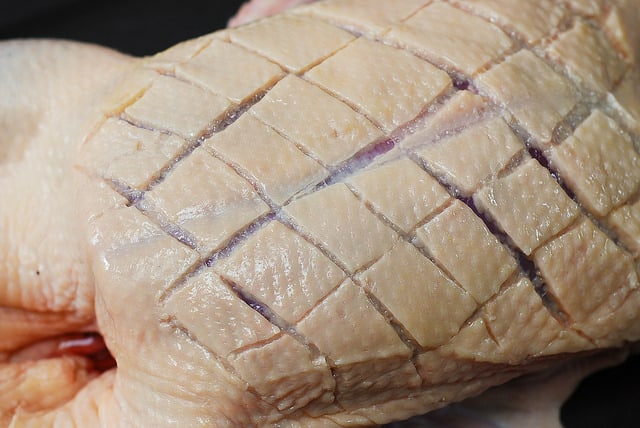
This is what the duck should look like, breast side up, scored (see 2 deep scores on the right - try not to do that but it's OK as long as you don't cut into the meat itself):
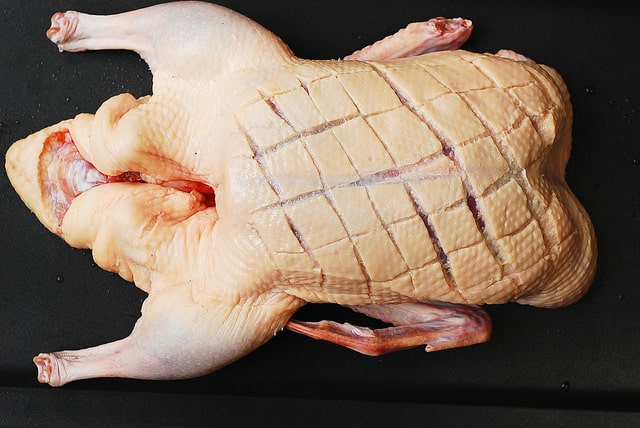
Poke the other fatty parts of the duck with the tip of the knife all over, to ensure fat release, especially in very fatty parts. You don’t need to poke the duck legs as the skin is pretty thin there (except for where the duck legs connect to the duck body).
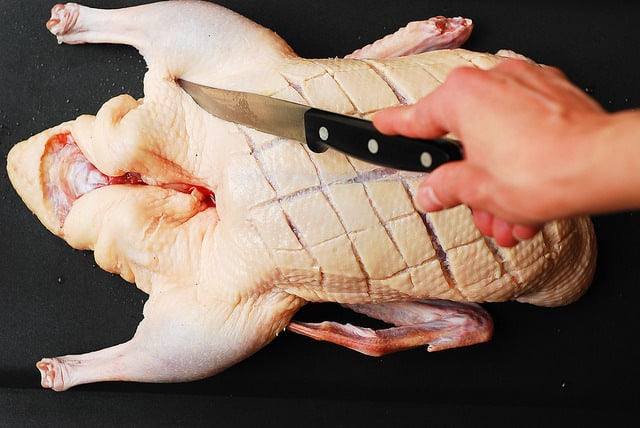
Season the duck very generously with salt both inside the cavity of the duck and outside on the skin, legs, all over.
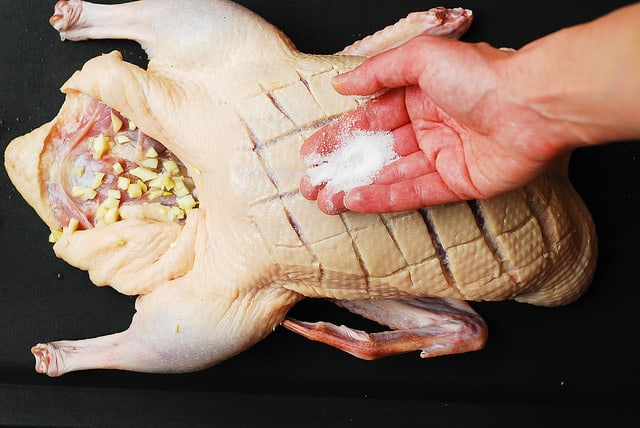
Put 5 chopped garlic cloves and lemon slices inside the duck cavity (these are just for flavor, not for eating - you will discard them after cooking).
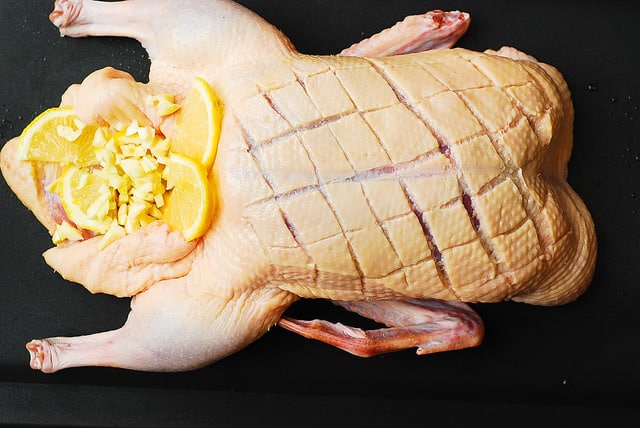
The duck will have flapping skin on both ends - fold that skin inwards, to hold the garlic and lemon inside.
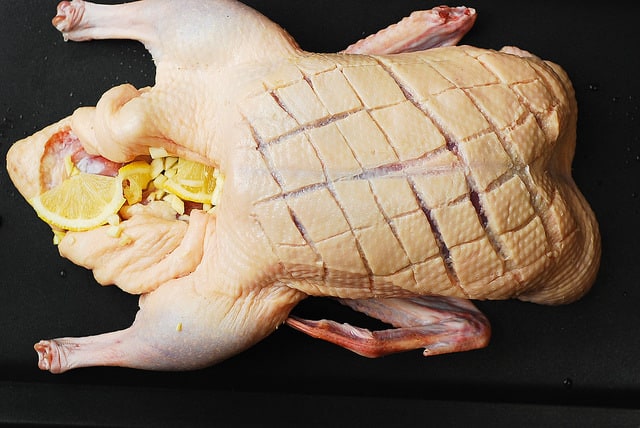
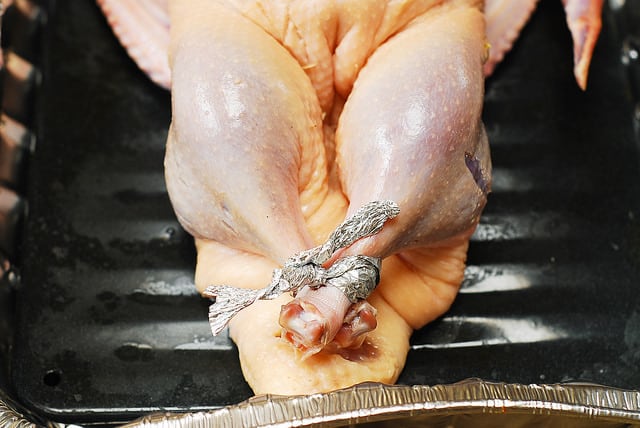
Tie the duck legs with butcher’s twine or butcher's string (or, in my case, I just used folded aluminum foil to tie up the duck legs, because I forgot to get butcher's twine):
Place the bird breast side up on a large roasting pan with a rack (the roasting pan should have a roasting rack to lift the duck from the bottom of the pan and allow the fat to drip below the duck).
How to roast a duck in the oven
THIS IS A RECIPE OVERVIEW WITH STEP-BY-STEP PHOTOS. SCROLL DOWN TO THE RECIPE CARD TO SEE THE COMPLETE RECIPE.
Here is the recipe for a duck cooked to the final internal temperature of 165 F (well-done, not dry, not overcooked, just juicy and well-done). Use an internal meat thermometer at all times to guide you through the process. Adjust the cooking times proportionally if you prefer to cook your duck medium (140 F internal temperature) or medium-rare (130 F internal temperature).
1) Roast the duck for about 40 minutes at 350 F, breast side up, then remove the duck from the oven, it should look like this after the first 40 minutes of roasting:
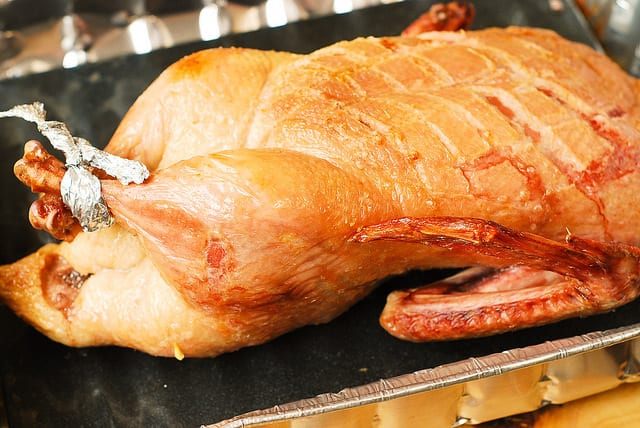
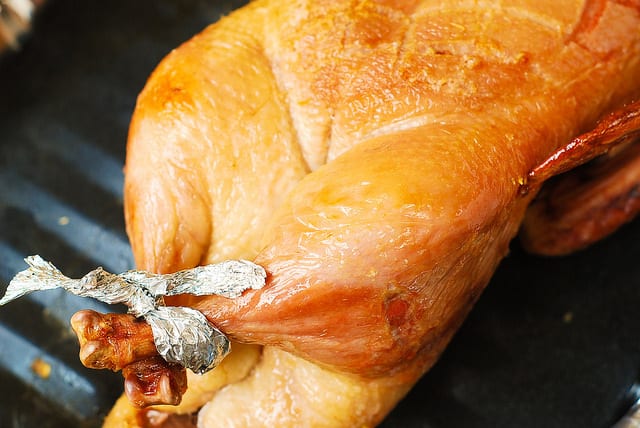
2) Then, flip the duck breast side down, and roast for 20 or 40 minutes at 350 F breast side down. After 20 minutes of roasting, check the duck's internal temperature with an instant meat thermometer. If the temperature reaches 140 F, proceed to the next step. If the meat temperature is below 140 F, roast the duck for 10 or 20 more minutes or until the temperature reaches 140 F. The duck should look like this - it's breast side down on this picture:
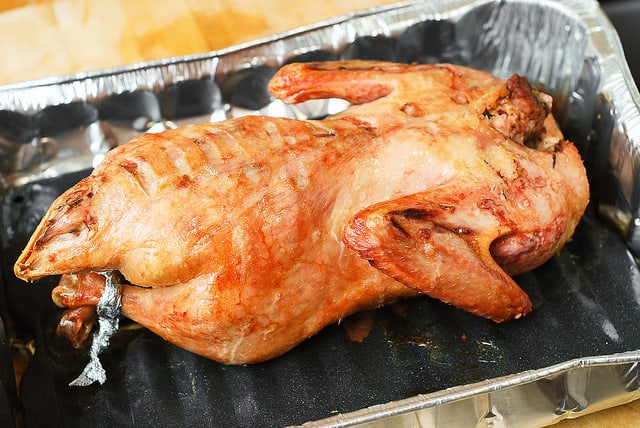
3) Remove the roasting pan with the duck from the oven, careful not to spill the juices (fat) in the roasting pan. Carefully remove the duck to a platter (making sure the lemons and garlic from the cavity do not fall out - keep the skin on both ends of the duck folded), and carefully pour off all the duck fat juices from the roasting pan into a large heat-proof bowl or container.
4) In a small bowl, combine ½ cup of balsamic vinegar with the freshly squeezed juice of 1 lemon and ¼ cup of honey. Set the duck breast side up again on the roasting rack in the roasting pan. Brush all of the duck with the balsamic mixture (especially the scored duck breast) and cook the duck breast side up for another 40 minutes at 350 F, brushing every 10 minutes with the mixture. Continue to measure the duck's internal temperature with the meat thermometer.
5) Add more honey to the mixture if it's too thin; it should be relatively thick. Roast the duck for another 20 minutes, brushing the duck breast side every 5 minutes with honey balsamic mixture.
6) Take the duck out of the oven once the internal temperature reaches 155 F (and after you've briefly broiled it if needed). Let it rest, uncovered, on the kitchen counter for about 15 minutes. During this time the duck will continue cooking in residual heat until it reaches 165 F.
In the end, the duck should be nicely browned with crispy skin like this:

Untie the legs:

If you want a really beautiful and festive presentation for your holiday duck, use my recipe for Roasted Brussels Sprouts, Butternut Squash glazed with Cinnamon & Maple Syrup, with Pecans & Cranberries.
You can garnish the duck and decorate the serving platter with these colorful veggies - they will have all the holiday colors and flavors and will look very pretty with duck:
Thanksgiving side dishes
- Garlic and Bacon Green Beans - crispy and crunchy green beans sautéed with garlic and bacon in olive oil and butter on stove top.
- Creamy and Crunchy Salad with Peas, Bacon, and Pecans - easy and beautiful side dish for Thanksgiving!
- Dijon Mustard Brussels Sprouts with Bacon, Apples, and Gorgonzola cheese - Brussels sprouts smothered in heavy cream and mustard with bacon, apples, Gorgonzola cheese and nutmeg. Cooked on stove top.

Roast Duck Recipe
Ingredients
Roast Duck
- 6 lb whole Pekin duck
- salt
- 5 garlic cloves chopped
- 1 lemon small or medium, chopped
Glaze
- ½ cup balsamic vinegar
- 1 lemon , freshly squeezed juice
- ¼ cup honey
Instructions
HOW TO THAW FROZEN DUCK
- If you purchased frozen duck, make sure to defrost the frozen duck in the refrigerator for a couple of days. Once the duck is completely thawed (in the refrigerator), take the duck out of the refrigerator 30 minutes before cooking to bring it more or less to room temperature.
PREHEAT THE OVEN TO 350 Fahrenheit
- Preheat oven to 350 degrees Fahrenheit. Prepare a large roasting pan with a rack (the roasting pan should have a roasting rack to lift the duck from the bottom of the pan and allow the fat to drip below the duck).
PREPARE THE DUCK
- Remove the giblets from inside the duck. Rinse the duck, inside and outside, with cold water. Pat dry with paper towels.
- Set the duck on the working surface. Score the duck's skin on the breast in a diamond pattern, ensuring you only cut the skin, without reaching the meat. Poke the other fatty parts of the duck with the tip of the knife all over, to ensure fat release, especially in very fatty parts. You don’t need to poke the duck legs as the skin is pretty thin there (except where the duck legs connect to the duck body). Season the duck generously with salt both inside the duck's cavity and outside on the skin, legs, and all over. Place the duck breast side up. (refer to step-by-step photos on scoring duck's skin above this recipe card - please scroll up).
- Put 5 chopped garlic cloves and lemon slices inside the duck cavity (these are just for flavor, not for eating - you will discard them after cooking). The duck will have flapping skin on both ends - fold that skin inwards, to hold the garlic and lemon inside. Tie up the duck legs with butcher's twine.(again, refer to the step-by-step photos above).
GENERAL GUIDELINES on roasting the whole duck safely in the oven
- Before you go ahead with the recipe, please review these general guidelines.
- According to USDA, to safely cook the duck in the oven at 350 Fahrenheit you have to cook it for 30 minutes per pound, which equals 3 hours for a 6-pound duck. Of course, one should use a meat thermometer and cook the duck to one's preference (medium-rear, for example), but at your own risk. 🙂 Here is the link for the USDA's safe cooking guidelines for whole ducks.
- The duck is considered safe to eat (according to USDA) when an internal temperature reaches 165 °F using a meat thermometer. That's when it's well done. If you take the duck out of the oven once the internal temperature is 155 F and let it sit for 10-15 minutes on the counter until it reaches 165 F - the duck will be well-done, delicious, and safe to eat. Check the internal temperature in the thigh's and wing's innermost part and the breast's thickest part.
- If you prefer to cook your duck rare or medium-rare, the internal temperature (as measured by a meat thermometer) at which you take it out of the oven is 130 Fahrenheit. For medium, take it out at 140 Fahrenheit. But it could be not safe to eat (according to USDA). Do so at your own risk. 🙂 The USDA recommends roasting the duck for 30 minutes per pound at 350 F to be safe.
RECIPE OVERVIEW
- With these considerations in mind, here is the recipe for a duck cooked to the final internal tempearture of 165 F (well-done, not dry, not overcooked, just juicy and well-done). Use an internal meat thermometer at all times to guide you through the process. Adjust the cooking times proportionally if you prefer to cook your duck medium (140 F internal temperature) or medium-rare (130 F internat temperature).
HOW TO ROAST THE DUCK IN THE OVEN
- Step 1. Roast for 40 minutes. Place the bird breast side up on a large roasting pan with a rack (the roasting pan should have a roasting rack to lift the duck from the bottom of the pan and allow the fat to drip below the duck). Roast the duck, uncovered, breast side up, for 40 minutes at 350 F.
- Step 2. Roast for 20 minutes (or up to 40 minutes). Flip the duck on its breast and roast it breast side down (roast the other side) for 20 more minutes, uncovered, at 350 F. After 20 minutes of roasting, check the duck's internal temperature with an instant meat thermometer. If the temperature reaches 140 F, proceed to the next step. If the meat temperature is below 140 F, roast the duck for 10 or 20 more minutes or until the temperature reaches 140 F. Keep in mind this recipe is for a well-done roasted duck. Please take a look at the 2 sections above GENERAL GUIDELINES and RECIPE OVERVIEW if you want your duck roasted medium or medium-rare. And always use a MEAT THERMOMETER.
- Step 3. Remove duck fat. You now have roasted the duck for 1 hour (or 1 hour 20 minutes total). Remove the roasting pan with the duck from the oven, careful not to spill the juices (fat) in the roasting pan. Carefully remove the duck to a platter (making sure the lemons and garlic from the cavity do not fall out - keep the skin on both ends of the duck folded), and carefully pour off all the duck fat juices from the roasting pan into a large heat-proof bowl or container.
- Step 4. Make a honey-balsamic glaze and roast for 20 minutes, brushing the duck with the glaze. Flip the duck breast side up again on a rack in a roasting pan (the pan will have no fat juices now). In a small bowl, combine ½ cup of balsamic vinegar + the freshly squeezed juice of 1 lemon + ¼ cup honey. Brush all of the duck with the balsamic mixture (especially the scored duck breast) and cook the duck breast side up for another 20 minutes at 350 F, brushing every 10 minutes with the mixture. Continue to measure the duck's internal temperature with the meat thermometer.
- Step 5. Roast for 20 minutes and continue brushing the duck with the glaze. Add more honey to the mixture if it's too thin; it should be relatively thick. Roast the duck for another 20 minutes, brushing the duck breast side every 5 minutes with honey balsamic mixture.
- Step 6. Broil the duck (optional and if needed). You can carefully broil the duck for about 5 or 10 minutes (check it regularly to ensure it doesn't char too much). Broiling the duck is a great option if the skin is not crispy enough. It will speed up the caramelization of the skin if your duck is already cooked to a desired internal temperature (as measured by a meat thermometer).
- Step 7. Remove the duck from the oven. Remove the duck from the oven once the internal temperature reaches 155 F (and after you've briefly broiled it if needed). Let it rest, uncovered, on the kitchen counter for about 15 minutes. During this time the duck will continue cooking in residual heat until it reaches 165 F.
- Step 8. Discard the lemon. Then, carefully remove and discard the lemon from the cavity (being careful not to get burned). Carve the duck and serve!
Notes
Updated recipe
I updated this recipe on October 28, 2023, to make it comprehensive. Let me know in the comments what you think (if the updates are helpful) or if you "miss" the old recipe (which I can repost).Why is the calorie amount in the Nutrition Section so huge?
The huge calories (about 3,000 calories per serving) you see on the nutrition label (the nutrition info on my site is approximate anyway!) include a large amount of duck fat rendered when you roast the duck. You will not eat this fat with the duck (it's rendered and then removed from the roasting pan). But you can save it and use some of it to roast the potatoes or eggs for the next several days.Duck's weight matters!
Ducks come in different sizes. The recipe, as written, is for a 6-pound duck. If your duck is half that size (3 pounds), adjust cooking times accordingly (in half). Use a meat thermometer as your guidance.Looking for Thanksgiving side dishes to serve with duck?
I have created a comprehensive recipe collection of 60 Thanksgiving side dishes conveniently categorized by ingredient: Green Beans, Butternut Squash, Sweet Potatoes, Brussels Sprouts, Potatoes, Acorn Squash, Spaghetti Squash, Asparagus, Broccoli, etc. It's a great resource to browse through for a last moment holiday inspiration! This side dishes will also work great for Christmas and New Year's Eve.Looking for a complete Thanksgiving menu?
Be sure to check out my 50 Best Thanksgiving Recipes (The Complete Holiday Menu) - it includes everything: Fall-inspired holiday appetizers, side dishes, salads, main courses, pasta recipes, desserts, and even breakfast. This holiday menu features proven, tried, and true Thanksgiving dishes that have been reader favorites for years (I've been publishing recipes since 2012).⬇️⬇️ My most popular Thanksgiving side dishes, salads, and desserts are below. They will pair beautifully with the roast duck. I highly recommend you check them out. ⬇️⬇️
Nutrition
Nutrition Disclaimer:
The nutritional information on this website is only an estimate and is provided for convenience and as a courtesy only. The accuracy of the nutritional information for any recipe on this site is not guaranteed. It should not be used as a substitute for a professional nutritionist’s advice.
My most popular Thanksgiving Side Dishes
- Thanksgiving Side Dish with Roasted Brussels Sprouts, Cinnamon Butternut Squash, Pecans, and Cranberries
- Roasted Acorn Squash Stuffed with Apples (cooked with brown sugar, cinnamon, and lemon juice)
- Stuffed Butternut Squash with Spinach, Bacon, and Cheese
- Butternut Squash Pasta Salad with Brussels Sprouts, Pecans, and Cranberries
- Roasted Brussels Sprouts with Bacon, Pecans, Dried Cranberries, and Balsamic Glaze
My most popular Thanksgiving Salads
- Fall Pasta Salad with Spinach, Roasted Butternut Squash, Pumpkin Seeds, Cranberries, and Goat Cheese
- Apple Spinach Salad with Pecans, Cranberries, Goat Cheese, and Maple-Lime Mustard Dressing
- Christmas Salad with Baby Spinach, Mandarin Oranges, Pomegranate Seeds, Cranberries, Pecans, and Honey-Mustard Lime Vinaigrette

Hi Julia,
This recipe is fantastic! I was looking for a simple and delicious way to cook duck. My husband can’t stop raving about how good it tasted. This recipe is a keeper for sure. I enjoyed it myself. Thank you.
Mari, thank you so much for your review - I really appreciate it! 🙂
Never tried cooking duck before but the recipe was simple and easy to follow. Duck turned out great. Wife was seriously impressed.
Glen, thank you for this wonderful review!
The glaze was great, but the cooking time was too long. The breast meat was dry and the leg/thigh fell apart when I carved it. 2 hours, not 3, would be about right, check the temperature, should be 160ish degrees Fahrenheit.
Agreed! I just read this recipe and decided to use the glaze but ignore the cook time. I wouldn't even cook a 6lb chicken for this long! 20 minutes per pound at 350 is plenty for duck!
Hi Julia!
I have used your wonderful recipe 3 times now and wow... It's absolutely the best! The duck roasts beautifully, and comes out so tender and so very tasty. Because I am a guy who likes a little heat, I added 2 teaspoons of cayenne powder to the basting mixture... So good. The balsamic vinegar and honey is genius. Thank you for the awesome, detailed, recipe. All the best to you!
Cliff, thank you for your kind message - I so appreciate it! ❤️ Love that you added some cayenne pepper - what a delicious twist!
I left a review earlier, but i may have accidentally omitted the “rating”
Louie, thank you for the 5-stars! ❤️
My store bought duck still has some pin feathers on it but so tiny, I tried to pluck them out but gave up. Is this mean my skin will be basically inedible..? :/
I wouldn't eat skin like that.
Based on a meat thermometer (135 in breast, 165 in thigh) my 6.5 lb duck was ready 40 minutes earlier than this recipe directed. I am glad I thought to check the temp. That also meant I didn’t have the honey glaze on the duck more than five minutes. Sadly that cut down on the flavor although it still tasted great (duck is always great provided it hasn’t over cooked). I’d like to try this again, cutting down the roasting time altogether. On the other hand, Julia’s directions on scoring the skin to release the fat are very effective. I scored both sides of the duck and there was still a lot of fat on it. Maybe I’ll try a 300 degree oven next time to extend the time in the oven and the rendering time. TIP: pour off the duck fat into a jar, let the solids settle (a fat separator helps) and save the duck fat in your fridge for cooking! Yummy!
Just tried this recipe. I admit, I was concerned about using the balsamic, but it turned out with great flavor. I did not cook mine for the full 3 hrs because after the second 40 minute stretch, it was very dark and ver crispy. I did the glaze and let it cook for ten more minutes and removed it from the oven. It glazed it more as it was resting. It turned out great and with amazing flavor. Thanks for the easy to follow recipe!
Brenda, I am so glad the recipe turned out great! 🙂 Thank you for your positive feedback!
My duck after three hours had not begun to brown. Had to jump temp to 400. Hoping it wasn’t a loss cause. Not a do over
Delicious! I should t have broiled it for more than 5 min. I burnt the top but it’s still very good moist and full of flavor. Thank you
So glad the recipe turned out well! 🙂 Thank you for this positive feedback!
Duck came out very very cheesy, but did have good flavor.
Alex, I am glad you liked the flavor of the duck!
I roasted the duck for my family and friends on 2 separate sitting during Christmas and everyone loved it! It was easy to follow even for first-timer like me. Thank you very much for sharing this tasty recipe!
Jess, I am so happy to hear the duck turned out well! 🙂 Thank you for taking the time to share this wonderful feedback and the 5-star review! 🙂
Just made this roast duck recipe (my first time making duck) and it turned out just like your pictures and pretty darn perfect!! I’ve bookmarked your page and will definitely use more of your recipes. Great to read and hear about your success.
Avoid this recipe.
The duck becomes enormously fat, both of us who ate it had a side affects from tremendous amount of animal fats. One of us even skipped work the next day, this is how we felt after this.
Louie, you are so sweet. Thank you for such a generous comment! And, so glad you loved the duck! ❤️❤️❤️
Oh the skin was really crispy. But the duck meat was so dry moat if it got thrown out. So sad!!!
Curtis, Here are some notes about how to ensure the roasted duck is moist and cooked properly ⬇️⬇️⬇️
➡️ 1) After 1 hour and 20 minutes of roasting, check the duck's internal temperature with an instant meat thermometer. If the temperature gets close to 145 F, skip to the next step (step 3 under section "Cook duck for 3 hours") and pour off all the duck fat juices into a heatproof dish and start basting the duck with the balsamic vinegar + lemon juice + honey mixture (include honey right away).
➡️ 2) Once the duck reaches an internal temperature of 155 F, your duck is ready to be removed from the oven. If the skin is not crispy enough, at this point you can carefully and briefly (5 or 10 minutes) broil the duck - constantly watching as not to burn the skin.
➡️ 3) Remove the duck from the oven once the internal temperature reaches 155 F (and after you've briefly broiled it if needed). Let it rest, uncovered, on the kitchen counter for about 15 minutes. During this time the duck will continue cooking in residual heat until it reaches 165 F.
➡️ 4) The duck is considered safe to eat (according to USDA) when an internal temperature reaches 165 °F using a meat thermometer. That's when it's well done. If you take out the duck once the internal temperature is 155 F and let it sit for 10-15 minutes on the counter until it reaches 165 F - the duck will be well-done, delicious, and safe to eat.
➡️ 5) If you prefer to cook your duck rare or medium-rare, the internal temperature at which you take it out is 135 F. But it could be not safe to eat (according to USDA). Do so at your own risk. 🙂
➡️ 6) You can also tell by duck juices how well done is the duck. The duck is done to medium rare if the juices are pinkish when you carefully cut the duck in the fattest part. The duck is well done when juices run yellowish in color. But the meat thermometer is the most accurate measure of doneness.
➡️ 7) Ducks come in different sizes. This note should be helpful to account for different weights. The recipe as written is for a 6-pound duck. If your duck is half that size (3 pounds), your cooking time for a well-done duck would be 1.5 hours. If you like your duck medium-rare (at your own risk ) the cooking time could be even lower. Use a meat thermometer.
➡️ 8) The huge calorie amount that you see in the nutrition includes the large amount of duck fat that's rendered when you roast the duck. You will obviously not eat this fat with the duck (it's rendered and then removed from the roasting pan). But you can save it and use some of it to roast the potatoes or eggs for the next several days. But, do not use it all - just a touch.
➡️ 9) According to USDA, to safely cook the duck in the oven at 350 F you have to cook it for 30 minutes per pound which equals 3 hours for a 6-pound duck as in this recipe. Of course, one should use a meat thermometer and cook the duck to his/her own preference (medium-rear, for example), but at his/her own risk :).
Here is the link for the safe cooking guidelines:
https://www.fsis.usda.gov/food-safety/safe-food-handling-and-preparation/poultry/duck-and-goose-farm-table#:~:text=USDA%20recommends%20cooking%20whole%20duck,thickest%20part%20of%20the%20breast.
Love the Recipe! Made twice. Do you have a video of this recipe? Thanks!
Cheryl, I am so glad you've made this twice and enjoyed it! No, I don't have a video of this, unfortunately.
Very very good recipe
Liked the flavor inside and out.
Sue, glad you loved this recipe! Thank you for the 5-star review! 🙂
Do I cover the duck when roasting?
Duckie, roast the duck uncovered at all times!
I followed the recipe step by step and the duck was way over cooked . It was not juicy but dry., very disappointing
David, I am sorry to hear that.
Here are some notes about how to ensure the roasted duck is moist and cooked properly ⬇️⬇️⬇️
➡️ 1) After 1 hour and 20 minutes of roasting, check the duck's internal temperature with an instant meat thermometer. If the temperature gets close to 145 F, skip to the next step (step 3 under section "Cook duck for 3 hours") and pour off all the duck fat juices into a heatproof dish and start basting the duck with the balsamic vinegar + lemon juice + honey mixture (include honey right away).
➡️ 2) Once the duck reaches an internal temperature of 155 F, your duck is ready to be removed from the oven. If the skin is not crispy enough, at this point you can carefully and briefly (5 or 10 minutes) broil the duck - constantly watching as not to burn the skin.
➡️ 3) Remove the duck from the oven once the internal temperature reaches 155 F (and after you've briefly broiled it if needed). Let it rest, uncovered, on the kitchen counter for about 15 minutes. During this time the duck will continue cooking in residual heat until it reaches 165 F.
➡️ 4) The duck is considered safe to eat (according to USDA) when an internal temperature reaches 165 °F using a meat thermometer. That's when it's well done. If you take out the duck once the internal temperature is 155 F and let it sit for 10-15 minutes on the counter until it reaches 165 F - the duck will be well-done, delicious, and safe to eat.
➡️ 5) If you prefer to cook your duck rare or medium-rare, the internal temperature at which you take it out is 135 F. But it could be not safe to eat (according to USDA). Do so at your own risk.
➡️ 6) You can also tell by duck juices how well done is the duck. The duck is done to medium rare if the juices are pinkish when you carefully cut the duck in the fattest part. The duck is well done when juices run yellowish in color. But the meat thermometer is the most accurate measure of doneness.
➡️ 7) Ducks come in different sizes. This note should be helpful to account for different weights. The recipe as written is for a 6-pound duck. If your duck is half that size (3 pounds), your cooking time for a well-done duck would be 1.5 hours. If you like your duck medium-rare (at your own risk ) the cooking time could be even lower. Use a meat thermometer.
➡️ 8) The huge calorie amount that you see in the nutrition includes the large amount of duck fat that's rendered when you roast the duck. You will obviously not eat this fat with the duck (it's rendered and then removed from the roasting pan). But you can save it and use some of it to roast the potatoes or eggs for the next several days. But, do not use it all - just a touch.
➡️ 9) According to USDA, to safely cook the duck in the oven at 350 F you have to cook it for 30 minutes per pound which equals 3 hours for a 6-pound duck as in this recipe. Of course, one should use a meat thermometer and cook the duck to his/her own preference (medium-rear, for example), but at his/her own risk.
Here is the link for the safe cooking guidelines:
https://www.fsis.usda.gov/food-safety/safe-food-handling-and-preparation/poultry/duck-and-goose-farm-table#:~:text=USDA%20recommends%20cooking%20whole%20duck,thickest%20part%20of%20the%20breast.
This is needlessly complicated. 20 minutes per pound is all that's needed to cook a duck perfectly. If you can't trust your duck to be safe for consumption when cooked rare to medium rare, source your duck elsewhere! Overcooked duck is a culinary tragedy!