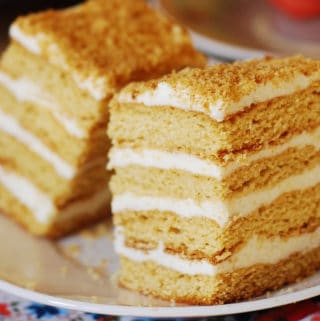
Russian Honey Cake with Cooked Flour Frosting - Medovik - a beautiful cake for a special occasion.

Today is a very special day, my blog's 1-year anniversary, which I am celebrating by baking a very special honey cake with a very special cooked flour frosting. You should definitely make it at least once in your lifetime - just to see how great this frosting is! My mom has been using this frosting made with flour and milk all along for the last 40 years! And it's my mom's recipe that I am sharing here - a recipe for my favorite Russian honey cake with cooked flour frosting - also known as Medovik Tort.


Yes, a year ago today I started this site, working on the very first recipe which I published on August 29th, 2012 - Thai red curry sauce with quinoa. Unbelievable that it's been already a year: surely, a lot has been done, quite a few recipes have been published, I've "met" and discovered so many great and talented food bloggers, and I've learned a whole deal about food blogging. Yet, it feels like I've only touched the tip of the iceberg: I want to publish more recipes more often, I want to connect more with other food bloggers through comments, social media. I need to learn so many new things, and I want to do so much more! And, the most important thing, I want to balance it better with the rest of my life, because there is so little time, especially with a family, a full-time job, friends, and, supposedly, a regular work-out schedule. I want to do more, but sometimes I feel lost as to when and how to manage it all! I welcome any tips and suggestions. 🙂

But, let's go back to this amazing Russian honey cake with an amazing cooked flour frosting, shall we? Growing up, this was the cake that my mom would make every year for special occasions, and since it's a 1-year birthday of my blog, it is only appropriate to celebrate it with this cake, isn't it?

This honey cake is definitely a celebratory cake, perfect for parties, birthdays, or anniversaries! I urge you to try it, if only to get a taste of this delicious frosting made from flour and milk - one of the best you'll ever try! It's much lighter than buttercream frosting, as it uses less butter because we're using flour/milk slurry as a thickening agent or butter-replacement here. The cooked flour frosting is also amazingly easy to spread and pipe. All-in-all it's just a great, lighter cake frosting!

The cooked flour frosting is essentially made by cooking flour and milk mixture, constantly stirring, on low-medium or even high-medium heat until it really thickens and all lumps dissolve. Separately, room temperature butter and white sugar are beaten really well, using electrical mixer. Then, the cooled flour/milk concoction is gradually added to the butter/sugar mixture and beaten until very creamy and smooth.

It's a very special cake, and I loved it since I was a kid. Even though it's called honey cake, a relatively small amount of honey is used: only ¼ cup for the cake batter, and there is no honey in the frosting cream. Yet, even this small amount of honey gives this very subtle and delicious flavor to the whole cake. And, don't forget that you will spread this cake with the most amazing cake frosting made from a slurry of milk and flour!

Russian Honey Cake - Medovik
Ingredients
Cake:
- 1 cup sugar
- ¼ cup honey
- 8 tablespoons butter
- 2 eggs
- 1.5 teaspoon baking powder
- 4 cups all-purpose flour
Cooked flour frosting / Cream:
- 2 cups milk
- 1 cup all-purpose flour , bleached flour
- 1 cup white sugar
- 1 cup unsalted butter (2 sticks)
Instructions
Cake:
- Preheat oven to 350 F.
- In a medium pan, add 1 cup sugar, ¼ cup honey and 1 stick butter – heat it up on low heat until everything is blended well together: honey softens up and sugar dissolves.
- In a large mixing bowl, whisk 2 eggs and 1.5 teaspoon baking powder until well combined. Add heated honey mixture from step 2 to the eggs mixture and stir until everything is well incorporated. Let the mixture cool down. When the mixture has cooled off, add 4 cups flour and whisk until just combined. You will have a pretty thick cake batter.
- Divide the cake batter in 4 portions, because we will have 4 layers of cake. Line 2 cookie sheets with foil, spray with non-stick spray. Using your hands, roll out the the first layer of the cake batter onto the lined cookie sheet, spreading the batter across the sheet. I usually run my hands under cold water, shake off some excess water and use wet hands to handle the dough – that way it doesn’t stick to your fingers. I actually use my hands to spread the batter across a cookie sheet and form a rectangle. I repeatedly rinse my hands with cold water (shaking off excessive water) to help spread the batter. Roll out the second layer of the cake batter onto the second cookie sheet sprayed with non-stick spray. Bake both sheets at the same time for 15 minutes at 350 F. When they are done, they should turn golden brown color. Remove from oven and remove the foil with the cake layer onto the cold surface to cool off.
- In the same manner as described, prepare the 2 remaining layers of the cake batter on the same cooking sheets, using new sheets of aluminum foil. Also, bake for 15 minutes. Let all 4 layers cool completely. Trim the edges so that all layers are the same size.
- Using food processor, finely chop the edges you just sliced off to create finely crumbled mixture which you will use to decorate the cake in the final step.
Cooked Flour Frosting:
- In a medium mixing bowl, whisk 2 cups of milk with 1 cup of flour until very well combined. The mixture in its thickness should resemble crepe batter (if you ever made one :)). It is very important that you use all-purpose white bleached flour! If you use unbleached flour, your frosting will not be white in the end!
- Add this mixture to a small pan and heat it up on low-medium heat, until mixture thickens and starts boiling, constantly stirring. At this point your mixture will start thickening really fast and will not be liquid any more – it will turn into very thick dough-like mixture, and will have lots of big clumps – that’s OK. Remove from heat, and continue stirring the hot thick mixture until all clumps dissolve – and they will dissolve easily at this point. You will have a nice slurry of flour and milk. Continue stirring the mixture until it somewhat cools down – it will help prevent it from sticking it to the bottom of the pan. It will be pretty hard to stir it as the mixture should be very thick. Allow this slurry mixture to completely cool down, occasionally stirring. You might even put it in the refrigerator.
- In a large mixing bowl, using electric mixer, beat 2 sticks of butter with 1 cup of sugar until very creamy and white.
- When the slurry of flour and milk from step 1 is cooled, add it gradually to the large mixing bowl with butter/sugar mixture, and continue beating, using electric mixer, until well incorporated and thick. Place the cream in the refrigerator to cool further.
Assemble the cake:
- Place one of the four cake layers on a large serving platter, spread ⅕th of the cream over the top. Place the other cake layer on top; spread another ⅕th of the cream over the top. Repeat with 2 remaining layers.
- Spread the remaining cream over the the four sides of the assembled cake. Sprinkle finely crumbled mixture (That you made in the food processor earlier) all over the top and the sides of the cake. Keep the cake in the refrigerator, and it only gets better the next day, when the cake layers soak up some of the cream and puff up, making the cake even taller.
Nutrition
Nutrition Disclaimer:
The nutritional information on this website is only an estimate and is provided for convenience and as a courtesy only. The accuracy of the nutritional information for any recipe on this site is not guaranteed. It should not be used as a substitute for a professional nutritionist’s advice.
A wonderful cake! It looks ever so tempting and delicious. I've never heard of that torte before...
Cheers,
Rosa
Rosa, thank you! 🙂
Happy Blogiversary Julia! 🙂 I celebrated my 1 year two weeks earlier. 🙂 Yay to our first year! This cake is the perfect way to celebrate. Looks absolutely stunning and delicious! Did I mention you are a pro at blogging? Your photos are just gorgeous!
Anne, you are so sweet! I can't believe you also celebrated your 1-year anniversary recently - I thought you were at this for much longer! 🙂 We're almost the same age then. 🙂
Happy 1st Blogiversary, Julia! Oh, that cooked buttercream frosting...my grandmother made her Red Velvet Cake with it and it was just divine. LOVE your pretty layered honey cake! And, you photographed it so beautifully. Cannot wait to make this one...it looks so inviting. All of your sentiments, reflecting your 1st year in blogging? DITTO! Thanks ever so much for sharing! 🙂
Yes, that's what I've read - that this frosting is actually a classic frosting used on the Red Velvet Cake, so I am glad to know that you've tried it. 🙂 Because for most people, it's a pretty unusual frosting, and they usually never had it. But you did, of course. 🙂
As soon as I saw the first photo it reminded me of Russia. 🙂 I love this cake!! I lived in Russia for a few months and when I returned home, I found a Russian bakery in San Francisco that made this cake. Such happiness. 🙂
How cool that you lived in Russia for a few months! Yes, this is a very popular Russian cake, any Russian bakery would usually carry it. 🙂
Happy birthday to your blog!!! What a magnificent, celebratory cake...I love all the beautiful layers!
Liz, thank you! Celebratory cake it is!
My goodness, those are some beautiful layers! Anything cake that totals more than three levels of cake just blows me away, but yours looks especially tender and tasty.
Thank you Hannah, the cake is really tender and it actually gets taller after the first day, when some of the frosting gets absorbed by the cake layers.
Julia, this is my favorite cake!!! Congratulations on your first year, you are doing amazing job!
Yelena, thank you! 🙂 I feel like I need to make another one, soon. 🙂
Happy Birthday! Your honey cake is gorgeous! I'm a honey and cake lover so the two together make me very happy. I'm intrigued by the frosting too! I never heard of such a thing - can't wait to try it. Wishing you another great year of blogging!
Thank you, Reeni! I love honey-based cakes, need to make them more often and experiment. 🙂
Happy 1 year! This cake looks AMAZING! It's beautiful and looks mad tasty. 🙂
Thanks, Tina 🙂
Happy blogoversary Julia! Medovik cake is really delicious!!! Yummy! 🙂
Thanks, Lea. 🙂 Medovik is one of the best cakes ever!
Congratulations on the blogiversary and the new blog design! It looks totally awesome! As does this cake. I need a celebration to make it for.
Thanks, Laura, always so good to see your comments! 🙂
Pinned! Yum that looks delicious and soft. I can almost taste this deliciousness. Thanks for sharing!
Thanks, Natasha! 🙂 My favorite cake!
Happy 1 year blogiversary! Yes, this cake seems and sounds like a perfect way to celebrate such a big milestone. I haven't been here for a while but you updated the site too. Very nice! I'm still struggling to find time for blog, and I have to say my only way to survive was to give up my sleep and free time. Not very "balanced" but I can only work after kids go to sleep and you know how time flies when you are working for blog! I need some tip on time management too! Always enjoy your photography and recipes, keep up the great work, Julia!
Happy Blog Anniversary! This looks like such an impressive cake and I have never heard of a cooked flour frosting. Really must try it! I do love frosting. The cake part sounds delicious too!
Thank you, Christin, always so good to hear from you! 🙂
Happy Bloggiversary! It's always a magical milestone to reach your first year and to be able to look back on your body of work. And what a lively way to celebrate your achievements! I haven't heard of a cooked-flour frosting at all, but I am always looking for ways to reduce the calorie/fat/sugar content of things I eat, so this looks like one for me. I tend to use cornflour (corn starch), like the French, to thicken what is essentially a white sauce - do you think it would work here? It might lighten it up a bit? From what I've read, it is banned to use bleaching agents in flour over here (!), so cornflour might provide that very-white colour too. I definitely love the sound of the recipe and the honey element. I must give it a go!
Hi Tash, always good to see you commenting here. 🙂 I've never used corn starch in a frosting, so I am not sure how it would work. Bleached flour is banned in the UK, really? How interesting. I made this frosting with unbleached flour too, and it came out really good, just not as white as this one, but still attractive. 🙂 So I would go with just regular unbleached flour. 🙂 And, congratulations on your 10 years - just sneaked over to your blog and saw your post. 🙂