There are many bread machine recipes out there, but if you're looking for just basic and simple homemade white bread - this is the perfect recipe for you!
This is my reliable, "boring", proven recipe for a basic white bread. And, I also provide tips on how to make a homemade white bread less dense in a bread maker. In this recipe, all you do is spend 5 minutes to add ingredients to the bread pan and the bread machine does all the work, on an automatic cycle that is already programmed. That's the whole purpose of the bread maker, right? The end result is a tasty loaf of white bread just of the right density.
I do believe that the day will come when I will use a bread machine for something more sophisticated, but for once this week I am sharing the recipe that doesn't require too much thinking or meddling. Sometimes it's just nice to make certain foods almost on auto-pilot, especially for basic stuff, like white bread.
In the last 3 months I hardly bought any store-made bread, baking about a loaf every week at home, using bread machine recipes. And, I've noticed a couple of trends/issues when making bread: sometimes the bread comes out way too dense, or the loaf does not rise enough and, as a result, comes out even denser. So, here I will describe the homemade bread recipe that works for me to produce a less dense bread in a bread maker, using a basic cycle.
While making bread in a bread machine, make sure to consider these points:
- When you measure flour using cups, make sure not to pack flour too dense in a measuring cup, otherwise you will end up with much more flour than you need, and, therefore, the bread will come out denser. Measuring flour correctly will solve a lot of "dense" issues. The trick that works for me is that I use ⅓ measuring cup to carefully scoop all flour I need into the bread machine (usually about 3 cups), without over-packing it. Another way would be to weigh flour, which I don't do, but it's a solution.
- Use bread flour, not regular all-purpose flour for all bread machine recipes. Bread flour contains a higher percentage of gluten than regular all-purpose flour. Using bread flour will produce taller, less dense loaves. If you use all-purpose flour (which has smaller percentage of gluten than bread flour), your loaves will be flatter and denser.
- When adding yeast, make sure you add it last, and add it on top of dry ingredients (flour). Make sure the yeast does not reach wet ingredients. Basically, make a small indentation on top of flour and add the yeast to the indentation, just like this:
And here is the simple white bread recipe. I started with the recipe that came in a little booklet together with my Williams-Sonoma bread machine, and I tweaked the ingredient measurements based on my preferences. It takes 10 minutes to prepare all ingredients together, and then it takes 3 hours and 15 minutes to bake the bread in a bread machine.

Bread Machine Recipe: How to make homemade white bread less dense
Ingredients
- 1 cup and 3 tablespoons water
- 2 tablespoons vegetable oil
- 1 ½ teaspoons salt
- 2 tablespoons sugar
- 3 ¼ cups white bread flour
- 2 teaspoons active dry yeast
Instructions
Important note about properly measuring flour using measuring cups:
- The proper way to measure flour using measuring cups is to aerate it first. This is done either by sifting flour, or aerating it by fluffing it up and whisking it well, then spooning it into the measuring cup, then carefully removing any excess flour with a knife. If you just stick that measuring cup in the bag of flour and scoop some out, you will get a lot more flour than what the recipe calls for. Do aerate the flour, or you will end up with dry dough!
How to make bread in a bread machine:
- Add water and oil into the bread pan. Add salt, sugar. Add flour.
- Make a small indentation on top of flour and make sure it does not reach wet ingredients. Add the yeast to the indentation.
- Keep yeast away from the salt.
- Insert the bread pan into the bread machine, press it down to snap. Close the lid.
- Use Basic bread, 1.5 lb loaf, medium crust cycle (3 hrs 15 minutes)
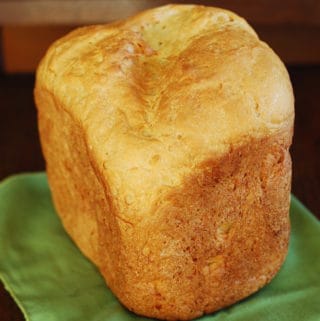
- When bread is done, remove the bread pan using oven mitts. Turn over the bread pan and shake it to release the loaf. Let the loaf cool on a wire rack for about 30 minutes.
Notes
Nutrition
The nutritional information on this website is only an estimate and is provided for convenience and as a courtesy only. The accuracy of the nutritional information for any recipe on this site is not guaranteed. It should not be used as a substitute for a professional nutritionist’s advice.
Incredible! I’ve made innumerable loaves according to the recipes in my bread maker’s manual. I’ve never eaten anything with such fine crumb and tender crust as this recipe produced. Yum. It recommends itself further for being lactose free. Thank you for sharing.
Candace, this is one of the best comments I've ever run across on my website. Thank you! And sorry for the late response - I've been too busy cooking new recipes in the Summer. 🙂
Julia,
Wow, finally a loaf of bread that is light and fluffy and not a boat anchor. Thanks for taking the time to write and share this.
Vince, thank you for your humor! 🙂 Glad you found this recipe helpful!
I've had a bread machine sitting for many years. When I used it years ago the loaves were tough and heavy. I finally decided it was time to get rid of my machine. I though let me try one last time. Well, now I’m keeping the machine. This recipe is fantastic. I’ll continue to use it.
I am wondering if anyone has specific additions to make this recipe into a cinnamon raisin bread?
I am super flattered by your comment! 🙂
Here are some variations that you can do using this recipe, starting with a cinnamon raisin bread variation that you requested:
1) Cinnamon raisin bread. You can certainly add about 3/4 cup raisins (even pre-plumped ones) and 1 teaspoon cinnamon to the flour (dry mixture). And, proceed with the recipe as is.
2) Bread with herbs. Another variation is to add about 1 tablespoon of Rosemary and 1/2 teaspoon of Italian seasoning (or some other combination of dry herbs, such as thyme) to the flour mixture.
3) Garlic bread. Yes, you can add crushed garlic! Add the crushed or minced garlic (about 2 or 3 tablespoons) together with the LIQUID INGREDIENTS, then add dry ingredients (just like the recipe states), then add the yeast last (making sure the yeast is not touching the liquid ingredients).
4) Cheese bread. If adding cheese, I would use about 1 cup of shredded cheese (use Parmesan or Asiago) and add it together with the DRY INGREDIENTS (bread flour). Add the bread machine yeast last. The yeast should not touch the liquid ingredients.
This is my favorite recipe. I am fairly new at the bread machine and I found this recipe and use it constantly. I use it for my cinnamon rolls and dinner rolls! Thank you so much
Claire, thank you so much for this positive feedback - I really appreciate it! 🙂
Hi . I made your bread for the first time in my bread machine. I love it thanks and keep up the good job.
Flo
From Louisiana
So glad you tried this recipe and found it useful! Thank you for such a positive comment!
I made this in the bread machine. It was perfection. Even the crust was delicious.
Cassie, I am so pleased to hear that! Thank you for sharing your positive feedback!
I have been trying everything to get a light fluffy loaf out of the bread maker. Thanks for this it was perfect
Jeff, I am so glad this recipe worked for you!
Hi Julia I've made my first ever Loaf in my new bread Machine with your recipe, after 3 attempts (i kept making silly mistakes i eventually succeeded, just wanted to say thank you my Husband said its the best bread he has ever tasted. So thank you Again. June.
Wow, June, what a wonderful and uplifting comment - thank you for that! 🙂 Glad you found the tips in this recipe helpful. And, thank you for taking the time to share your feedback!
I was looking for a easy, good machine bread recipe and yours is the best one so far! Didn’t disappoint me not even once. Thank You ❤️
Lucy, I am so flattered by your comment! Thank you! I am very happy you found this recipe useful and helpful! 🙂
Hi Julia,
Thank you so much for taking the time to do this page. I have been using some of your recipes for months now but just now I had the time to leave you a comment. I discovered your page looking for ideas and recipes for the oven bread. All of the recipes I have made at home from your page have turned out fabulous. I am still trying to improve my technique by making breaks in the regular oven. Any tips?
Warmly and sending many blessings to you and your family,
Mara
From Alaska
Mara, your comment made my day! 🙂 I am so flattered by your comment, and thank you for taking the time to share such a positive comment - it means a lot to me! 🙂
About making the bread in a regular oven: You can certainly use the machine only for kneading - and let the bread rise outside of the machine and then bake it in the oven at 350 F for about 25 mins. Also, for the baking cycle, move the bread dough into a bread loaf pan (oven-safe) and bake it in the oven.
what would the measurement be for bread machine or instant yeast?
Debbie, I did use active dry yeast in this recipe but from everything I've read, you can easily use bread machine yeast pretty much in a similar manner for this particular recipe. So, the choice is up to you. Here is a great article that addresses this in more detail:
https://www.breadmachinediva.com/what-is-bread-machine-yeast/
Julia, I’m so thankful for your recipe. I have tried the one that came with my bread maker and several others from Pinterest, and none turned out. This is so simple and easy to make! Thank you. It’s very delicious. I can’t wait to try the variations!
-Lana in Alabama
Lana, I am so flattered by your comment - thank you for taking the time to share such positive and detailed feedback! 🙂