
I am pretty cheap and practical when it comes to a lot of things. For example, I don't own or use Photoshop or Lightroom software, and the only lens that I use to take my food photos costs only $100. I buy all my nice Nike running and work-out outfits (worth around $40 each) at about $2 or $1 each at nearby Goodwill stores. That's the cheap part of me.
The practical part of me knows that I simply don't have time to learn all the wonderful features of Adobe Photoshop, and I am not going to buy that expensive piece of software only to use a fraction of its capabilities to adjust my photos in a very minor way.
The lazy part of me does not want to deal with post-processing at all, I just want to shoot the photo and be done with it. So, the lazy part of me tries to get the shot right so as not to require any subsequent photo editing, and as a result I do not post-process most of my photos. However, there are a few instances here and there, when the light is wrong, or I screwed up the exposure, or the photo did not come out bright enough, and in these cases I found some pretty powerful photo editing software online. There are no downloads required, everything is done online, it's free. Interestingly, one of these resources is by Adobe.
So, here they are, my favorite free online photo editors:
My favorite free online photo editor for making collages:
And, by the way, I think Adobe Photoshop and Adobe Lightroom are both great, and eventually I do plan on purchasing them, but in foreseeable future I just don't see myself using either of those two often enough or using their capabilities enough to justify the expense.
I am also planning to write more posts about particular features I use with these free photo editors to edit and enhance the minority of my food photos.
Here I just want to give you a couple of examples of how I used these photo editors:
- The photo at the top of this post is an after/before image adjusted for brightness, saturation, and sharpness, using Pixlr.com.
- These 2 collages (one of them adores my Facebook account) were made with Picmonkey:
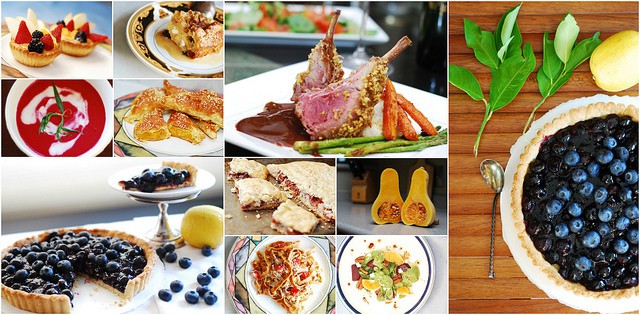
My Facebook cover image
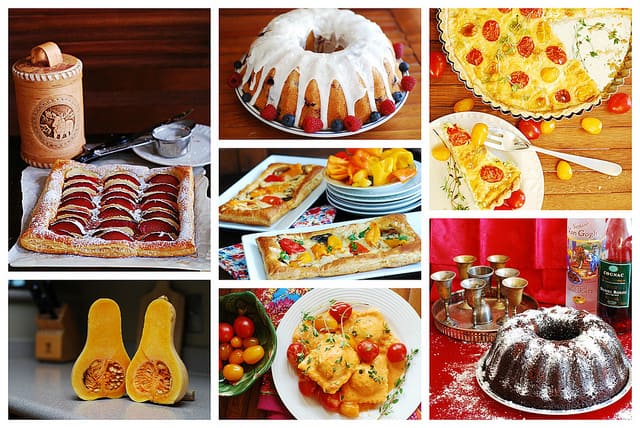
Image for one of my posts
Great list - I've found some fantastic additional free photo editors that could be of interest, I've reviewed them all here:
https://www.itpages.com/best-free-photo-editors/
I hope they help!
I've never thought of doing this before! I think I can get my 5 year old to love this idea too!
Great blog, glad I find you!
Thanks for the tips Julia!! Your photography is outstanding and to learn that you take the practical approach to buying equipment, etc... is awesome. I tend splurge on photo equipment--my husband hates that lol.
Talaia, I noticed that WholeYum was pinning my recipes - thank you very much! 🙂 It also prompted me to check out your site and I already bookmarked it "need to check it out more" 🙂 By the way, I just purchased Lightroom - they had a special and I only spent $100 on it! 🙂
It's always nice when something free is also good)) But, I think you should not deny yourself the pleasure of 30 day free trial of Lightroom 😀 I was just like you describe yourself, until I somehow stumbled upon the free trial... I never looked back. I think once you try it you will absolutely fall in love with all the things you can do with it (editing-vise) and see why other's use Lightroom. I was not paid to tell you this, but I know the difference it made for me and the way I felt after that trial... I really think you should try it 🙂 It is really easy to use (i did not take any classes and figured out how to use it within a couple of minutes of downloading), and nothing like the Photoshop... anyway, just thought I'd share 🙂
You can get the free trial by going to the adobe Lighroom website, they offer it all the time...
Hi Julia,
Thanks for stopping by my blog 🙂 I absolutely love yours! Great job!
Thank you for sharing these tips. My kitchen doesn't have natural light so I try to cook and take pix as much as I can on weekend mornings. When I cook at night, I adjust my DSLR for indoor light, but it still doesn't produce the desired effect. Oh, I can't wait to play with these websites!
Thanks a bunch,
Julia
Thanks for visiting! I take many of my photos using a speed light, because majority of my cooking happens in the evening. For instance, the photo at the top (the platter with chicken and 2 wine glasses) was taken in the evening using a speed light. Not the best photo, but not too bad either. Especially after brightening it up with an online photo editor. 🙂
This is such a great post! I have people asking me about this all the time, so now I know where to send them. 🙂 I had to buy Photoshop when I was in school, so I just use that, but if I didn't already have it, I'd be looking for a free option too!
Students get such great discounts on Photoshop!
I am right there with you Julia! But I think my other reason, besides the insane price of photoshop/lightroom software is the time commitment for me to learn how to use it...they feel a little overwhelming to me!
I use Picasa - a free Microsoft program and it suits my minimal photo editing needs - for right now at least!
Thanks for sharing!! 🙂
Exactly, to use Photoshop to its fullest potential requires a time investment, and when I am ready to dedicate my time to it, I might purchase it. But for what I need at this point, online photo editors are just as good. And yes, I've used Picasa a little bit, too, and then I sort of forgot about it. Need to revisit it again.
I love that last photo! I've never used picmonkey but I've used photoshop and lightroom for years. I'm off to investigate. Lovely to meet you, Julia!
Wonderful recommendations! I love picmonkey too!! There's nothing wrong to be "thrift", especially when times are so hard these days. In fact, kudos to you!!! 🙂
Thank you! There are always great finds in stores like that.
I love picmonkey! Great recommendations and pictures are truly picture perfect! Awesome post!!!!!
Thank you! Picmonkey is so user friendly.
Julia,
Thanks for all these tips. I think your photography is beautiful and I will take your advice. My photography is different, (setting wise) but I can use your tips to make improvements.
I had to grin at your confession for shopping at thrift stores! They're on my regular rounds too!!
Noel
Goodwill is so great! I also find it a great source of books (I love biographies and buy a lot of otherwise expensive books there), unique dinnerware, sportswear as I mentioned, and kid clothes (for friends and family).
I confess I do use Photoshop (I have it for work also) but I LOVE pixlr too and recommend it constantly. Your photos are so bright and inviting and the collages are fantastic as well!
Thanks. What's funny is that I use Pixlr only on a very few of my photos. I really don't like to spend my time editing photos, only when I absolutely have to.
I had never heard of Pixlr..Thanks! Great illustrations too.
Pixlr is great, works for all my photo-editing needs.
This is great - been looking for an online application to make collages. Do you know of any (or does PicMonkey allow you to write on the photos as well, for posts or FB or such?
I use PicMonkey for collages only, and I've used Pixlr for writing text on photos. If you open Pixlr Editor (Advanced) - it has a text tool (big letter A at the bottom of their left tool bar), which allows you to create high quality text with a large variety of fonts, sizes. Pixlr is also great if you need to create or make an existing image into a certain size in pixels (for website header, for instance).
Hi Julia. Thanks for your recommendations and links to the free online photo editors and especially the collages maker. It's really helpful. I have been looking for a free online collages maker for a while now without much luck. Will definitely have to try out the picmonkey.
Picmonkey is the best on web I found as far as making collages. I looked at A LOT OF SITES! They have so many options, and within those options you can move photos, expand them, reduce them, very flexible.