This post may contain affiliate links. Read my disclosure policy.
Make authentic Pad Thai at home with this easy recipe! Chewy rice noodles are tossed with a homemade tangy-sweet sauce, tender chicken, succulent shrimp, and silky scrambled eggs. Top this Thai stir-fried noodle dish with crushed roasted peanuts, fresh lime, crispy bean sprouts, and scallions.

Restaurant-Quality, Authentic Pad Thai at Home
I fell in love with Pad Thai during a trip to Thailand years ago, eating it from street vendors in Bangkok late into the evening. I also ordered it again and again at restaurants during the two weeks my husband and I stayed on the gorgeous island of Koh Samui (Thailand's second-largest island), known for its coconut groves and dense, mountainous rainforest. It quickly became my favorite Thai dish, along with drunken noodles and duck curry.
Fast forward several years and countless plates of Pad Thai later, and I've recreated that magic in my own kitchen. My version honors the traditional method with chewy rice noodles, a tamarind-fish sauce base, proteins quickly seared to maintain their texture, and silky scrambled eggs. I also add the essential finishing touches, such as crunchy peanuts, fresh scallions, bean sprouts, and lime wedges.

The result is a restaurant-quality dinner that's surprisingly easy to make at home in about 45 minutes. It tastes as if it came straight from a Bangkok street cart, but you can make it in the comfort of your own kitchen. Homemade Pad Thai beats takeout every time!
If you love Thai cuisine, try my Thai Shrimp Soup, authentic Thai Chicken Curry, reader-favorite Coconut Curry Salmon, protein-packed Thai Duck Curry with Pineapple, and Thai Banana Curry next.

What is Pad Thai?
Pad Thai (ผัดไทย) is Thailand's iconic stir-fried rice noodle dish. The name literally means "Thai stir-fry" ("pad" means stir-fried in Thai). It's traditionally made with rice noodles tossed in a sauce of tamarind, fish sauce, and palm sugar, then stir-fried over very high heat with protein, eggs, bean sprouts, garlic, and peanuts.
One of the defining characteristics of authentic Pad Thai is its perfectly balanced sauce. Rather than relying on a single dominant flavor, every bite combines salty fish sauce, tangy tamarind, sweetness from sugar, rich umami, fresh herbs, crunchy peanuts, and a squeeze of lime.
Like many beloved traditional dishes, every cook has their own version. Some recipes use shrimp, others chicken, pork, tofu, or a combination. My recipe combines shrimp, chicken, and tofu for an especially satisfying, PROTEIN-packed meal.

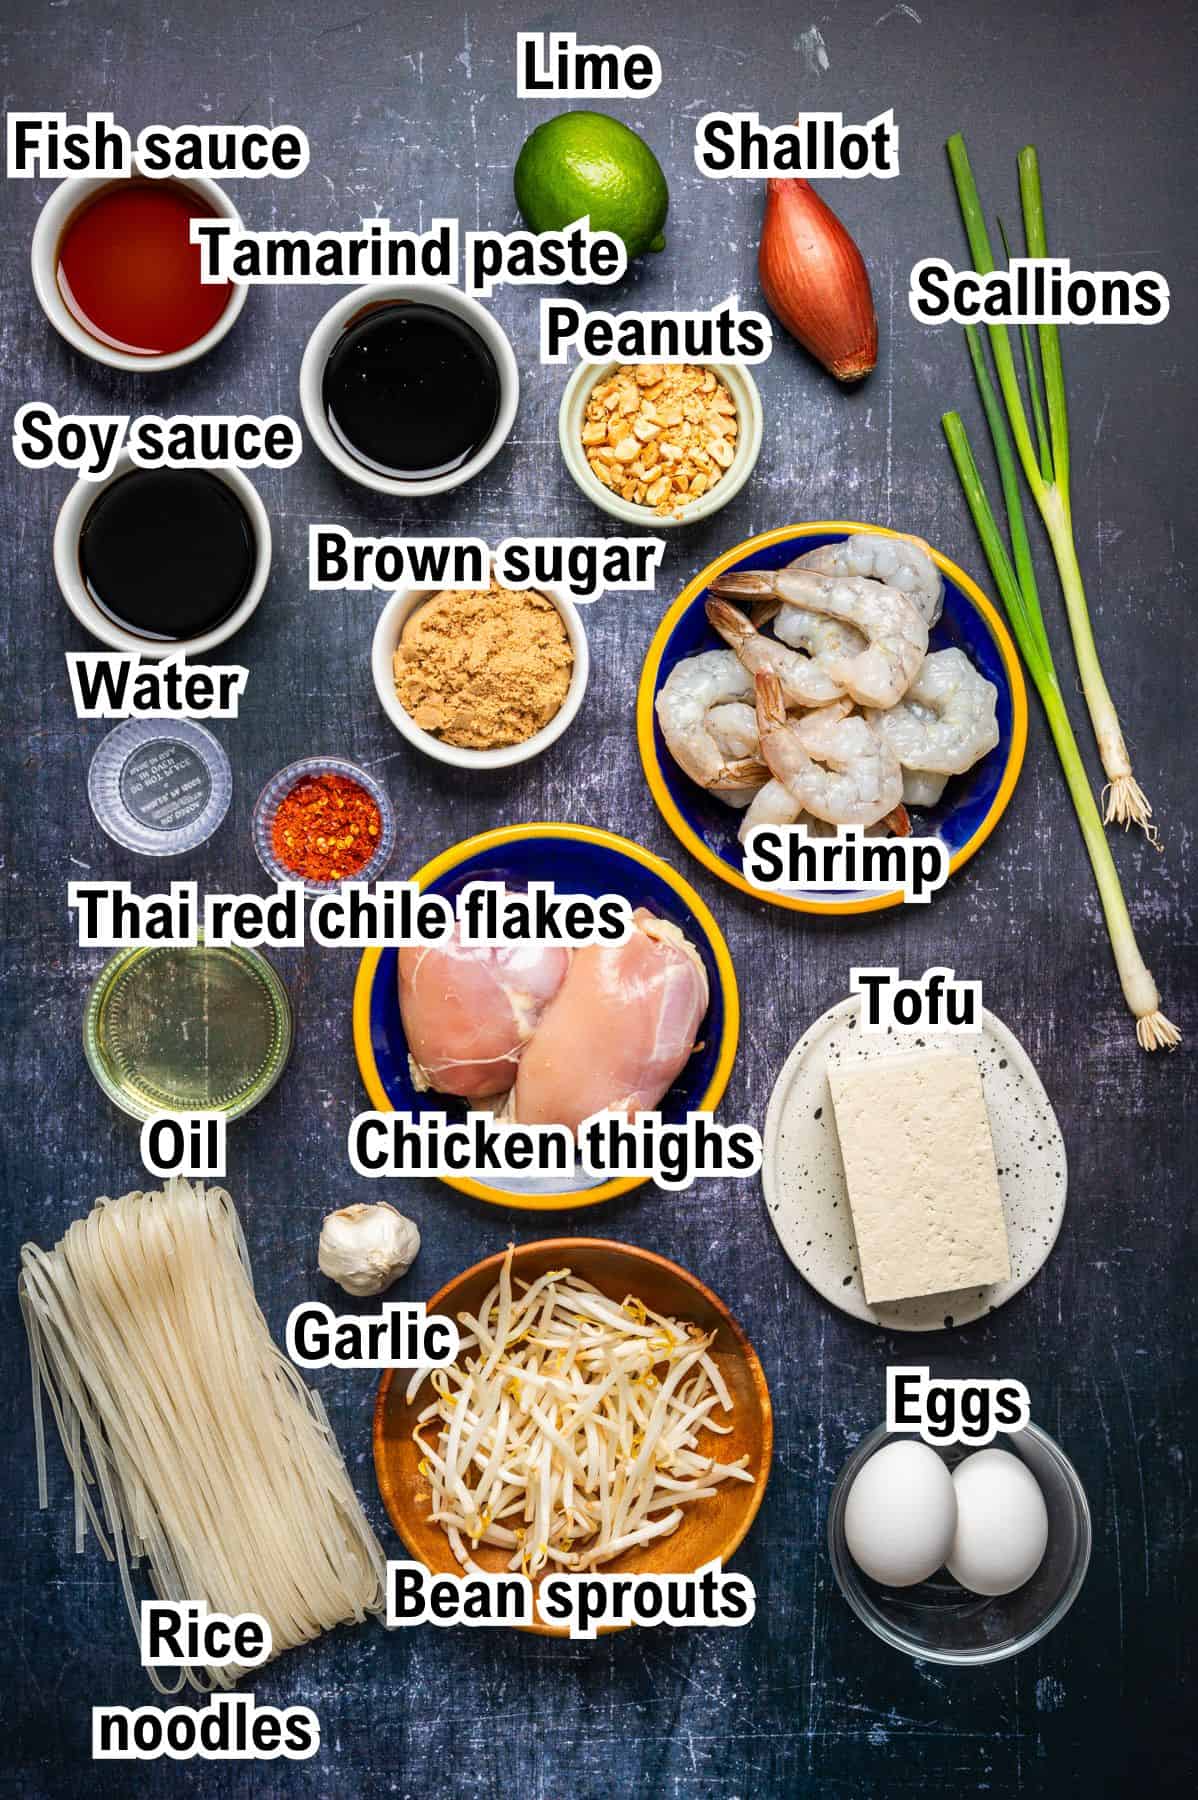
Ingredients and Substitutions
- Rice Noodles: Thin or medium-width rice noodles both work well. Soak them in warm water until they're flexible but still slightly firm. They will finish cooking in the skillet while absorbing the sauce.
- Chicken thighs: I used boneless, skinless chicken thighs - they are a perfect choice for high-heat cooking since they stay juicy. Slice them thinly so they cook quickly. Use thinly sliced chicken breast, pork, or beef, or add more shrimp!
- Shrimp: Large or jumbo shrimp work best. Allergic? Don't like it? Just leave it out or replace it with a protein of choice. Still want seafood? Add in scallops, salmon, or octopus and make sure it is fully cooked prior to serving.
- Extra firm tofu: Tofu is commonly used in traditional Pad Thai and adds another layer of texture. Pressing it briefly before cooking helps it brown nicely. It adds extra protein but you can omit this if you like!
- Tamarind is one of the signature ingredients in authentic Pad Thai. It gives the sauce its distinctive tangy flavor that simply can't be replicated with lime juice alone.
- Brown sugar: Pad thai is traditionally made using palm sugar, but we've substituted it with brown sugar for this recipe as it is easily accessible. Use palm sugar if you have it! You can also use white sugar as well.
- Soy sauce: Tamari or coconut aminos work just as well!
- Fish sauce: There are now vegan fish sauce brands out there if needed!
- Bean sprouts add freshness and a slight crunch. Stir them in during the final minute so they stay crisp.
- Roasted peanuts provide one of the signature textures of Pad Thai. I like stirring some into the noodles and adding even more on top before serving.

The Art of Pad Thai: Understanding Traditional Technique
Find the complete ingredient amounts and recipe instructions in the full printable recipe card or continue reading for helpful tips.
The beauty of Pad Thai is its speed and wok technique. In Thailand, vendors cook Pad Thai over extremely high heat in a matter of minutes. The key is having everything prepped and ready before you start cooking. Let me show you what makes it work and how to make authentic Pad Thai at home:
- Have Everything Prepped: Pad Thai moves fast. Before you turn on the heat, have your noodles drained, sauce mixed, proteins cut, garlic minced, and garnishes ready. This isn't a dish where you can multitask while cooking.
- Soak the Noodles: I usually start here. Soak the rice noodles in warm water for 20 to 30 minutes, until just pliable. Drain and set aside.
- Make the Sauce: While the noodles soak, whisk together the fish sauce, brown sugar, tamarind paste, soy sauce, and water until the sugar is mostly dissolved. Set the sauce aside.
- Expert Tip: You'll use both the noodles and the sauce later, so having them ready before you start cooking makes the process much easier.
")
- High Heat: A screaming-hot wok or large cast-iron skillet is essential. This keeps proteins tender and creates slight char on the noodles without making them mushy.
- Tofu Prep: Press your tofu gently between paper towels to remove excess water before cubing or cutting into matchsticks. This helps it brown instead of steam.
- Don't Crowd the Pan: If your wok or skillet is too small, cook the proteins in batches. A crowded pan steams rather than sears, and you'll lose that wonderful caramelization.
")
")
- The Egg Scramble: Pushing ingredients to the sides and scrambling the eggs in the center creates silky ribbons that coat the noodles beautifully.
")
- Quick Cooking: Once the noodles hit the pan with sauce, they should soften and absorb the flavors in just 3-5 minutes. Overcooking turns them gummy.
")
- Fresh Finishes: Bean sprouts, scallions, and peanuts are added at the very end to preserve their texture and brightness. They're not meant to be cooked into the dish.
")

Must-Have Pad Thai Toppings
- Lime Wedges: You always see those served with Pad Thai at Thai restaurants. A squeeze of fresh lime juice at the table brightens the whole dish.
- Crushed Roasted Peanuts: Sprinkle generously over the top for crunch and richness. The more, the better here. I always ask for extra peanuts at Thai restaurants!
- Fresh Bean Sprouts: Crisp, fresh, and slightly sweet - these veggies add the perfect texture!
- Sliced Scallions: Adds a mild onion flavor and beautiful green color.
- Thai Red Chile Flakes: For those who love heat. Let guests add to their own bowl. I personally do not like my Pad Thai plate overly spicy.

Variations
Pad Thai is incredibly versatile, so feel free to customize it and make it your own while honoring the traditional foundation:
- Vegetarian Pad Thai: Skip the chicken and shrimp and use extra tofu, or add more vegetables like bell peppers, mushrooms, snap peas, carrots, and broccoli. Just make sure to par-cook them in a skillet or wok before fully cooking them and incorporating them into the Pad Thai. Stir in baby spinach during the final minute.
Use soy sauce or tamari instead of fish sauce. - Shrimp-Only Pad Thai: Simply increase the shrimp to ¾ pound and omit the chicken and tofu for a lighter, seafood-forward version. This version will be appropriate for Pescatarians - a vegetarian diet that includes seafood.
- Single Protein Pad Thai: Use all chicken or all shrimp or all tofu if you prefer a single protein.
- Pad Thai with Beef: Swap the chicken for thinly sliced beef (sirloin or flank work well), searing it quickly over high heat like the chicken.
- Spicy Pad Thai: Add 1-2 Thai bird's eye chiles (minced and seeded for less heat) to the sauce, or increase the red chile flakes for those who love heat.
- Pad Thai with Peanut Sauce: For a slightly different flavor, stir 2-3 tablespoons of creamy peanut butter into the sauce while heating.

What to serve with Pad Thai
Pad Thai is a complete meal on its own, but I love serving it with simple Thai- or Asian-inspired appetizers, sides, or vegetables. Here are some ideas:
- Fresh spring/summer rolls
- Cucumber salad
- Viral Dumpling Salad with Creamy Peanut Dressing
- Thai Chicken Satay
- Thai Shrimp Soup
- Crunchy Asian Salad with Veggies and Peanut Dressing
- Mango-Avocado Salad
- Hot and Sour Soup like Tom Yum
- Edamame
- Mango with sticky rice for dessert
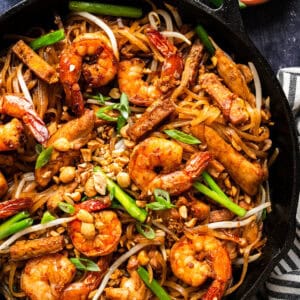
Pad Thai with Chicken and Shrimp
Ingredients
RICE NOODLES
- 8 oz rice noodles thin or medium; soak in warm water 20-30 min until pliable
PAD THAI SAUCE
- 3 tablespoons fish sauce
- 3 tablespoons brown sugar
- 2 tablespoons tamarind paste
- 2 tablespoons soy sauce
- 1 tablespoon water
FOR THE STIR FRY
- 4 tablespoons neutral oil divided, extra if needed
- ½ pack extra firm tofu cut into ½" cubes or matchsticks, gently pressed to remove water
- 2 medium boneless skinless chicken thighs sliced into thin strips
- ½ pound large or jumbo shrimp peeled, deveined, tails on or off
- 3 cloves garlic minced
- 1 medium shallot thinly sliced
- 2 medium eggs lightly beaten
- 1 cup bean sprouts
- 3 scallions green parts sliced to 1 ½" long
- ¼ cup roasted salted peanuts roughly chopped
GARNISH
- Crushed or chopped salted roasted peanuts
- Lime wedges
- Scallions sliced
- Bean sprouts
- dried Thai red chile flakes OPTIONAL
Instructions
- Prepare noodles: In a large bowl, soak the rice noodles in warm water for 20-30 minutes until just pliable. Drain and set aside.
- Make sauce: While the noodles soak, whisk together the fish sauce, brown sugar, tamarind paste, soy sauce, and water in a small bowl until the sugar is mostly dissolved. Set aside.
- Sear tofu: In a cast iron skillet or wok, heat 2 tablespoons of oil over high heat and add the tofu. Cook on all sides until just golden brown, then remove and set aside.
- Sear chicken: Turn the heat to high and add 1 more tablespoon of oil to the pan. Once hot, add the chicken in an even layer and sear, turning once, until lightly browned on the outside, about 3 minutes total. The chicken does not need to be fully cooked at this stage. Remove and set aside with the tofu.
- Sear shrimp: Keep the heat on high and add 1 more tablespoon of oil if needed. Sear the shrimp for about 1-2 minutes per side until lightly browned but still undercooked. Remove and set aside with the tofu and chicken.
- Sauté garlic and shallots: Reduce the heat to medium, add more oil if needed, and saute the garlic and shallots for 1-2 minutes, until fragrant and just translucent.
- Combine veggies and proteins: Return the tofu, chicken, and shrimp to the skillet and stir to combine with the garlic and shallots.
- Scramble eggs: Push everything to the sides of the pan to create a well in the center. Pour the beaten eggs into the well and let them cook undisturbed until about 80% set, then gently stir the eggs into the rest of the mixture.
- Add the drained noodles and pour the prepared sauce evenly over the top. Using tongs, gently toss and stir to coat the noodles, allowing them to soften fully and completely absorb the sauce, about 3-5 minutes.
- Add the bean sprouts, scallions, and peanuts and toss briefly, just until the sprouts are slightly wilted. If the noodles look dry, add 1-2 tablespoons of water as needed to loosen the sauce.
- Adjust flavor: Remove from heat and taste, adjusting with additional fish sauce or a squeeze of lime if desired.
- To serve: Divide the Pad Thai among plates or serve directly from the skillet. Top generously with chopped peanuts, scallions, lime wedges, and chile flakes if using. Enjoy!
Notes
- Prep ahead: It's important to prep everything prior to cooking as the process is quite quick.
- Using high heat is your best friend for your proteins! We don't want to burn them, but given the short amount of time they are in the pan, the likelihood of burning is low. However, do lower the heat for your aromatics (like garlic and shallots), so they don't burn.
- Preferred noodle texture: You want your noodles to be pliable and still firm, but not soggy as you finish cooking them in the pan.
- Sauce texture: If needed, add a splash of water to help thin out your sauce if it's too dry.
- To prevent sticking, keep moving the ingredients in the pan.
- Balance your pad thai flavors! Want it more sour? Add another tablespoon of tamarind paste to your sauce. Want it more sour AFTER you've cooked your pad thai? Squeeze the right amount of lime juice over your noodles. Want it sweeter? Sprinkle a tiny bit of brown sugar directly on top and mix in.
Storage and Reheating Tips:
- Fridge: The Pad Thai can be stored in an airtight container for up to 3 days. For the best texture, store garnishes separately and add just before serving.
- Freezer: I don't recommend storing Pad Thai in the freezer, as it will significantly alter the texture of not only the noodles, but also the proteins.
- Reheat: Either reheat in a skillet over medium heat with 1-2 tablespoons of water or stock, tossing gently to heat through or microwave by loosely covering it and reheating at 30-45 second intervals, stirring occasionally, until it reaches your desired temperature. If the noodles seem dry, add a splash of water.
You Will Need These Supplies:
- Knife
- Cutting board
- Measuring spoons
- Measuring cups
- Cast iron skillet or wok
- Mixing bowls
- tongs
Your Feedback:
Have you made Pad Thai at home before? I'd love to hear about your experience! Leave a comment below with any tips, questions, or variations you've tried. Happy cooking!Nutrition
Nutrition Disclaimer:
The nutritional information on this website is only an estimate and is provided for convenience and as a courtesy only. The accuracy of the nutritional information for any recipe on this site is not guaranteed. It should not be used as a substitute for a professional nutritionist's advice.

Thanks to you, this is the first time getting desirable results attempting Pad Thai! Actually, I have had such good luck following your creations. Very happy to follow you and get inspired to make yummy meals!
What is neutral oil????
Can I leave the tofu out???
I have an entire binder full of your recipes! This one is great!