This post may contain affiliate links. Read my disclosure policy.
This is my go-to tart crust recipe. I've been making a lot of tarts lately (both sweet and savory), and wanted to share the basic recipe how to make a slightly sweet and very flaky tart crust from scratch that can serve as a base for various fruit tarts and tartlets. Use 9.5 inch tart pan.

This tart dough recipe produces an amazingly flaky and light crust, so please follow it closely: I'll be describing it in a lot of detail, but making a tart crust is super easy once you understand how it works.
This recipe uses 9.5 inch tart pan.
Tart crust ingredients
Precise measurements are important for making tart crust:
- 1 ½ cups flour
- ¼ cup sugar
- ⅛ teaspoon salt
- 10 tablespoons butter cold unsalted
- 2 egg yolks
- 1 tablespoon heavy cream
- ¼ teaspoon vanilla extract
How to make tart crust
1) Using food processor, pulse the flour, sugar, salt to combine thoroughly.
2) Cut cold butter into small cubes.

3) Add the butter into the food processor (which already has flour, sugar and salt combined from step 1)

4) Pulse this mixtures in the food processor until the consistency becomes that of a coarse meal.
5) In a small cup, combine the egg yolk, heavy cream and vanilla and stir well together. Add the egg mixture to the food processor and pulse to combine.


6) Shape the dough into a disk on a foil. I usually do it with my hands and fingers pushing the dough away from its center into a round shape, pressing into the foil. Use a very small amount of flour to dust working surface to avoid dough clinging to the foil. I occasionally bring the tart pan over the tart dough to make sure the round I am making is larger in diameter than a well of my tart pan.
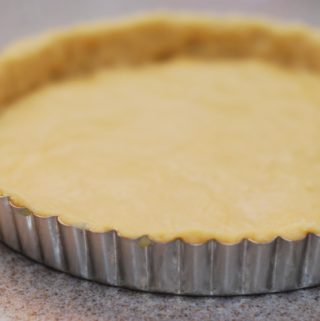
7) Grease the 9.5 inch tart pan. Then, I take the foil and and ease the round into a tart pan, patting it firmly into the bottom and up the sides. Carefully remove the foil:

8) If some pieces of crust fall off, just gently press them back. If your foil gets stuck to the dough, don't remove it and refrigerate the tart shell. After your crust has been refrigerated for at least an hour, you will be able to remove foil easily.
9) Extend the dough slightly above the rim to compensate for any shrinkage during baking.
10) Place the tart pan with the dough in the refrigerator for at least an hour. Cover tart pan with plastic.
11) Preheat oven to 400 F. Line the cold tart shell with a sheet of aluminum oil, with edges hanging over the sides of the tart pan.


12) Place pie weights into the shell. In my case, I used rice and quinoa.

13) Bake the tart shell for 15 minutes. Remove from oven, lift the foil with weights out of the pan.
14) Continue baking the tart shell without weights and aluminum foil for 15 minutes, until golden brown color. Let it cool.
Your tart crust is ready!
How to use tart shell
- You can use this pre-baked tart shell as a base for various tart fillings where the tart crust is pre-baked in advance (as described above), and the filling is prepared separately, as well, and then just added into the pre-baked tart shell, such as in this Blueberry Tart recipe.
- For other recipes, you will pre-bake this tart shell only for the first 15 minutes, and then you will add a filling and continue baking the tart shell with the filling already in it - as in this breakfast tart. Enjoy, experiment, and I'd love to hear how it turns out for you!
How to Make Sweet Tart Crust
Ingredients
- 1 ½ cups flour
- ¼ cup sugar
- ⅛ teaspoon salt
- 10 tablespoons butter cold unsalted
- 2 egg yolks
- 1 tablespoon heavy cream
- ¼ teaspoon vanilla extract
Instructions
- Using food processor, pulse the flour, sugar, salt to combine thoroughly.
- Cut cold butter into small cubes. Add the butter into the food processor (which already has flour, sugar and salt combined from step 1) and pulse until the consistency becomes that of a coarse meal.
- In a small cup, combine the egg yolk, heavy cream and vanilla and stir well together. Add the egg mixture to the food processor and pulse to combine.
- Shape the dough into a disk on a foil. I usually do it with my hands and fingers pushing the dough away from its center into a round shape, pressing into the foil. Use a very small amount of flour to dust working surface to avoid dough clinging to the foil. I occasionally bring the tart pan over the tart dough to make sure the round I am making is larger in diameter than a well of my tart pan.
- Grease the tart pan. Then, I take the foil and and ease the round into a tart pan, patting it firmly into the bottom and up the sides. Carefully remove the foil. If some pieces of crust fall off, just gently press them back. If your foil gets stuck to the dough, don’t remove it and refrigerate the tart shell as described in step 6. After your crust has been refrigerated for at least an hour, you will be able to remove foil easily.
- Extend the dough slightly above the rim to compensate for any shrinkage during baking. Place the tart pan with the dough in the refrigerator for at least an hour. Cover tart pan with plastic.
- Preheat oven to 400 F. Line the cold tart shell with a sheet of aluminum oil, with edges hanging over the sides of the tart pan. Place pie weights into the shell. In my case, I used rice and quinoa.
- Bake the tart shell for 15 minutes. Remove from oven, lift the foil with weights out of the pan.
- Continue baking the tart shell without weights and aluminum foil for 15 minutes, until golden brown color. Let it cool.
Notes
Nutrition
Nutrition Disclaimer:
The nutritional information on this website is only an estimate and is provided for convenience and as a courtesy only. The accuracy of the nutritional information for any recipe on this site is not guaranteed. It should not be used as a substitute for a professional nutritionist’s advice.
This tart recipe is superb! Even though my tart's edges were a bit crispier than desired, the tart's flavor was delicious and its consistency was perfect.
Thank you, Rose, for your rave review - it means a lot to me! 🙂