
This post may contain affiliate links. Read my disclosure policy.
There are many bread machine recipes out there, but if you're looking for just basic and simple homemade white bread - this is the perfect recipe for you!
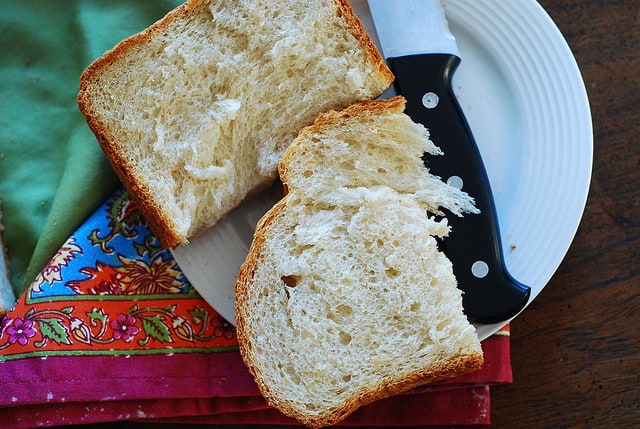
This is my reliable, "boring", proven recipe for a basic white bread. And, I also provide tips on how to make a homemade white bread less dense in a bread maker. In this recipe, all you do is spend 5 minutes to add ingredients to the bread pan and the bread machine does all the work, on an automatic cycle that is already programmed. That's the whole purpose of the bread maker, right? The end result is a tasty loaf of white bread just of the right density.
I do believe that the day will come when I will use a bread machine for something more sophisticated, but for once this week I am sharing the recipe that doesn't require too much thinking or meddling. Sometimes it's just nice to make certain foods almost on auto-pilot, especially for basic stuff, like white bread.
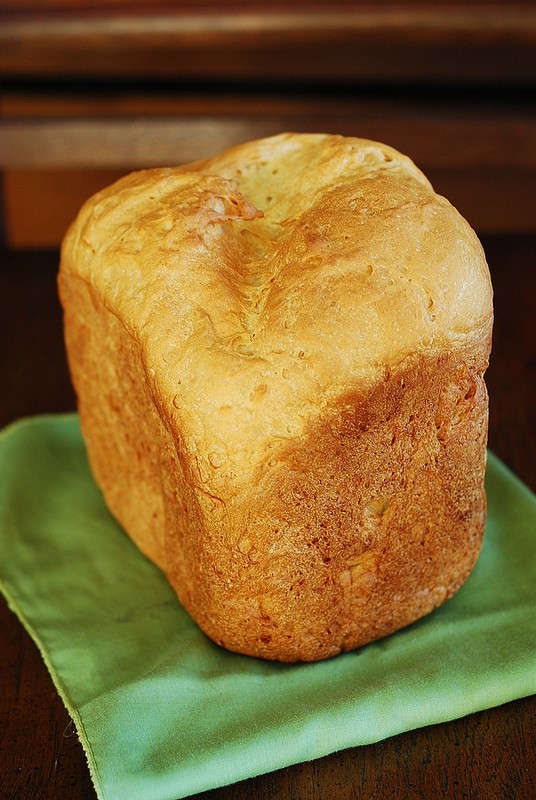
In the last 3 months I hardly bought any store-made bread, baking about a loaf every week at home, using bread machine recipes. And, I've noticed a couple of trends/issues when making bread: sometimes the bread comes out way too dense, or the loaf does not rise enough and, as a result, comes out even denser. So, here I will describe the homemade bread recipe that works for me to produce a less dense bread in a bread maker, using a basic cycle.
While making bread in a bread machine, make sure to consider these points:
- When you measure flour using cups, make sure not to pack flour too dense in a measuring cup, otherwise you will end up with much more flour than you need, and, therefore, the bread will come out denser. Measuring flour correctly will solve a lot of "dense" issues. The trick that works for me is that I use ⅓ measuring cup to carefully scoop all flour I need into the bread machine (usually about 3 cups), without over-packing it. Another way would be to weigh flour, which I don't do, but it's a solution.
- Use bread flour, not regular all-purpose flour for all bread machine recipes. Bread flour contains a higher percentage of gluten than regular all-purpose flour. Using bread flour will produce taller, less dense loaves. If you use all-purpose flour (which has smaller percentage of gluten than bread flour), your loaves will be flatter and denser.
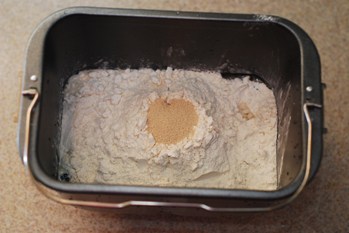
- When adding yeast, make sure you add it last, and add it on top of dry ingredients (flour). Make sure the yeast does not reach wet ingredients. Basically, make a small indentation on top of flour and add the yeast to the indentation, just like this:
And here is the simple white bread recipe. I started with the recipe that came in a little booklet together with my Williams-Sonoma bread machine, and I tweaked the ingredient measurements based on my preferences. It takes 10 minutes to prepare all ingredients together, and then it takes 3 hours and 15 minutes to bake the bread in a bread machine.
Bread Machine Recipe: How to make homemade white bread less dense
Ingredients
- 1 cup and 3 tablespoons water
- 2 tablespoons vegetable oil
- 1 ½ teaspoons salt
- 2 tablespoons sugar
- 3 ¼ cups white bread flour
- 2 teaspoons active dry yeast
Instructions
Important note about properly measuring flour using measuring cups:
- The proper way to measure flour using measuring cups is to aerate it first. This is done either by sifting flour, or aerating it by fluffing it up and whisking it well, then spooning it into the measuring cup, then carefully removing any excess flour with a knife. If you just stick that measuring cup in the bag of flour and scoop some out, you will get a lot more flour than what the recipe calls for. Do aerate the flour, or you will end up with dry dough!
How to make bread in a bread machine:
- Add water and oil into the bread pan. Add salt, sugar. Add flour.
- Make a small indentation on top of flour and make sure it does not reach wet ingredients. Add the yeast to the indentation.
- Keep yeast away from the salt.
- Insert the bread pan into the bread machine, press it down to snap. Close the lid.
- Use Basic bread, 1.5 lb loaf, medium crust cycle (3 hrs 15 minutes)
- When bread is done, remove the bread pan using oven mitts. Turn over the bread pan and shake it to release the loaf. Let the loaf cool on a wire rack for about 30 minutes.
Notes
- The recipe is adapted from Williams-Sonoma bread machine booklet.
- I have recently tweaked this recipe and made a delicious rustic Bread Machine Garlic & Herb Bread (with fresh rosemary and thyme) - worth checking out!
My Other Bread Recipes
Nutrition
Nutrition Disclaimer:
The nutritional information on this website is only an estimate and is provided for convenience and as a courtesy only. The accuracy of the nutritional information for any recipe on this site is not guaranteed. It should not be used as a substitute for a professional nutritionist's advice.

I tried this recipe and it was good. I tried it again without the sugar as I find it too cake like - it was the best loaf I have tasted in a long time! Thanks also for the great tip about aerating the flour.
hi ya just wondering if I can put the dough on the dough setting and put it in the loaf pan insteaed
I've been looking at pasta makers, and I'm stuck between getting an Atlas or an Imperia.
Which one is a better maker?.
This basic recipe can be found in numerous web searches. I use it all the time.
Correct flour measuring / management IS essential. Temperature management is also important.
I use a thermometer to obtain 110 F. water/sugar or honey mixture. (microwaved about 55 sec. for a cup of water in my weak little 700 Watt Zapper)
If too hot, I just let it sit on the counter until it's 110F. Too cool, give it a few more seconds in the microwave. After a couple of times, you'll know how long it takes for your nuclear cooker!
I put my 2 Tsp of Yeast (Red Star active dry) in to the pre-warmed 110F sugar water for 10 minutes and mix gently but well. It will be a little bubbly and frothy on top after 10 minutes. (set a timer!)
Mean while, I have my Bread machine pan pre-warming with the oil in the bottom and flour/salt mixture poured on top of the oil, on the 10 minute pre-heat cycle of my bread machine. Or, if no preheat cycle on your machine, you could preheat it in a bath of warm tap water. At the very least, get the pan by itself warmed up.
Add the flour and mixed in salt to the bread pan, warmed oil is sitting in the bottom. Pour in the warm water, sugar, yeast mixture....hit the go button!
Now for the really cool part!
After the first need, or shortly before the first need is finished, I add about 3/4 cup of Almond Honey Bunches of Oats breakfast cereal. Just dump it in there!
Because the cereal is designed to be crunchy in milk (doesn't absorb moisture because of it's sugary coating), it does not effect the flour to moisture ratio. The bread comes out the same weather you use it or not. But, the taste is really like honey, with small crunchy bits of almonds and grains throughout! It's Killer!!
I should try Capt'n Crunch or Fruit loops.
Count Chockula would be interesting!
ChaZ
I used this recipe "by the letter" in a Zojirushi BB-PAC20 (a top of the line bread machine). Worst bread experience that I have ever had. FAR TOO MUCH LIQUID.
Not sure why this recipe would not work in the Zojirushi. I have the same model (BB-CC20), and this recipe is nearly identical to basic white bread recipe they provide in the manual with the machine. Zojirushi recommends adding 2 Tbls. of dry milk powder, they actually call for slightly MORE water than this recipe does (1 1/2 cups vs. 1 cup + 3 Tbls.) -- probably to rehydrate the milk, and they call for 4 1/2 cups of flour. (Maybe the Zojirushi pan is larger?) Additionally, the Zojirushi includes 2 Tbls. of butter instead of 2 Tbls. vegetable oil. You can use either, as I have. My biggest gripe about that recipe is that it tends to be a bit heavy for basic white bread. Sifting the flour before measuring it really does help -- I nearly always do. The troubleshooting section of the Zojirushi manual recommends using 2 Tbls. less water for a lighter bread, but that hasn't made much of a difference. As a result, I frequently just use the machine to make the dough and let it rise once. Then I remove it from the bread maker, knead it a few times, and let it rise again. Then bake in the oven. The bread tends to be lighter, and more palatable to me that way.
Hi I made white bread today to use for sandwitches and when I slice the loaf the middle falls apart. I used white flour for I do not have bread flour is this the problem?
That could be the problem - bread flour has more gluten so it will hold the bread together better. In general, these homemade breads do fall apart more easily - it's normal - I always use a very good serrated knife and it works really well! If I don't use a good serrated knife - there is a high chance the middle of the loaf will fall apart.
I have not heard anyone mention using an electric knife to slice bread . It is so much easier and easy to cut straight too . Love this recipe for bread .Also for wheat bread you can add powdered gluten and get good results ..
Used this recipe last night, having multiplied it up for a 2.5lb loaf in a larger bread maker. I was greeted this morning with a light loaf twice the size of the previous bricks I created using the recipe from the instruction manual! Texture and taste is excellent.
Many, many thanks!
Steve, wow what a nice and funny comment! 🙂 I've been long planning to make a larger loaf using this recipe, hopefully I'll make it soon and maybe even post about it. 🙂
Yes! This is what I do for more than 10 years and I have the best bread ever! If you mix a teaspoon with sour cream and a yolk and brush it on the bread you will have the best crust ever. I love to braid the bread and add some sesame seeds on top right before I send it to the oven.
Simona, brushing the top of the bread with the yolk mixture is a brilliant idea. I do it for other baked things I make but never thought to apply it to a regular bread. Have to remember to do it next time!
Thank you for the wonderful recipe.
I usually use bread machine yeast with my bread maker and bread came out very good. Until I bought a big pack of Active Dry Yeast (ADY) from Costco and used in bread machine. My bread was crumbly and fall apart easily. There is a website said that I need to use 3/4 tsp of ADY for every cup of bread flour. When I tried this , the bread was too much yeast and it got bigger even over flow the bread pan. I gave up making the bread until I found this website. I made one loaf this evening. It turned out very good. Thank you for sharing.
By the way, do you have 2 Lb recipe?
Thank you, Pen! Glad the bread turned out good for you. I don't have a 2 lb recipe - should make it soon though!
Would like to try this recipe - do you have the measurements in grams?
I love this recipe! I was wondering if I could substitute the white flour with whole wheat will it come out the same if I use less wheat?
Hi Megan, I know that when baking desserts, I successfully used 1 and 1/2 cups of whole wheat flour vs. 2 cups of all-purpose flour. Not sure if the same substitution proportion works for bread, but whole wheat flour is definitely much dryer than the regular one, so reducing the amount of flour is key.
I bought a bread machine and made a couple of "bricks" the bread was awful. I've tried your recipe twice, the 2nd time I sifted the flour twice. The first load was 100% improvement on my brick, the second was even lighter. Absolutely delicious.
Do you have a recipe for a "non-brick like" whole wheat loaf - or should I just try the recipe I have but sift the flour?
A very interesting point, for the first loaf - I measured 3 1/4 cups of flour straight from the flour packet, then I sifted it and measured it again and was surprised that I had about 1/2 cup flour left over from the original measurement.
Thank you so much for this wonderful recipe. I shall be using it for a long long time.
Carey, thank you very much for such a sweet comment! I am glad your breads are not "bricks" any more. 🙂 Whole wheat flour is definitely much dryer than the regular one, so reducing the amount of flour is key while keeping all other ingredients the same. When baking whole wheat muffins once, I successfully used 1 and 1/2 cups of whole wheat flour vs. 2 cups of all-purpose flour. Not sure if the same substitution proportion will work for bread, but you should definitely reduce the amount of whole wheat flour in relation to other ingredients, otherwise it won't even mix properly.
So I finally tried a few different things since my recent success posted above
1. Used actual bread flour, the difference was substantially better
2. Ran out of oil so I substituted milk, worked just as well
3. Last night ran out of milk (that's embarrassing lol) so I substituted a chunk of butter and OMG it was soooo much better. The loaf expanded a lot more than it was per above recipe and it was softer and more moist.
Please try above recipe but substitute butter instead of oil and see how it works and post results. I didn't really measure the butter, just used a really heaped dessert spoon full
Thanks Paul - so many useful tips in your comment. Great to know that milk or butter work well in place of oil. I am very intrigued that the butter made such a difference, resulting in a fluffier bread - definitely need to try that next! Need to buy some bread flour too, I don't think I have any left over.
Thank you, thank you, thank you!!!!
I had given up on my Oster bread machine until I stumbled upon your recipe. All of my previous loaves were dense and inedable. "Bricks" my husband would call them. Today I made my first ever perfect loaf of bread!! The kids, husband and even neighbors agree! I'll be baking all our bread fresh from here on out!!
p.s.- how do you suggest I store this bread? Just curious...
Jen, so glad to hear that your bread came out perfectly! Bread machines are such a great tool! I usually store the bread in a sealed plastic (freezer) bag and keep it at room temperature on the counter - because this bread doesn't last long anyway (it usually gets eaten within 4 days). To store it longer, I would keep it in a sealed plastic bag, refrigerated.
Thank you for this recipe. I bought a pricey bread machine and was scared to use it but I finally broke it out last week and tried 1 loaf of wheat bread and 1 loaf of white. The wheat was too dense for our liking. The white was better but I still want it to be fluffier like the store bought bread. I will be giving this recipe a try for sure this week. Now if I can only perfect my slicing abilities. I swear I went through half the loaf trying to get 2 decent looking slices to make my hubby a sandwich to work lol
Ha-ha, yes, slicing can be a challenge - but with a good serrated knife it can be done! I usually tend to slice thicker slices with homemade bread.
The secret to easy slicing is as simple as a very good bread knife.
My mom has always used an electric knife and it cuts the bread like butter 🙂
Thanks for the recipe! I too have suffered from dense bread since I bought my machine... after reading your recipe and instructions I now realize that I was probably packing twice as much flour on all of them! Crazy stuff. The new one is in the machine now... Can't wait! Only 165 kinutes to go.