
This post may contain affiliate links. Read my disclosure policy.
There are many bread machine recipes out there, but if you're looking for just basic and simple homemade white bread - this is the perfect recipe for you!
This is my reliable, "boring", proven recipe for a basic white bread. And, I also provide tips on how to make a homemade white bread less dense in a bread maker. In this recipe, all you do is spend 5 minutes to add ingredients to the bread pan and the bread machine does all the work, on an automatic cycle that is already programmed. That's the whole purpose of the bread maker, right? The end result is a tasty loaf of white bread just of the right density.
I do believe that the day will come when I will use a bread machine for something more sophisticated, but for once this week I am sharing the recipe that doesn't require too much thinking or meddling. Sometimes it's just nice to make certain foods almost on auto-pilot, especially for basic stuff, like white bread.
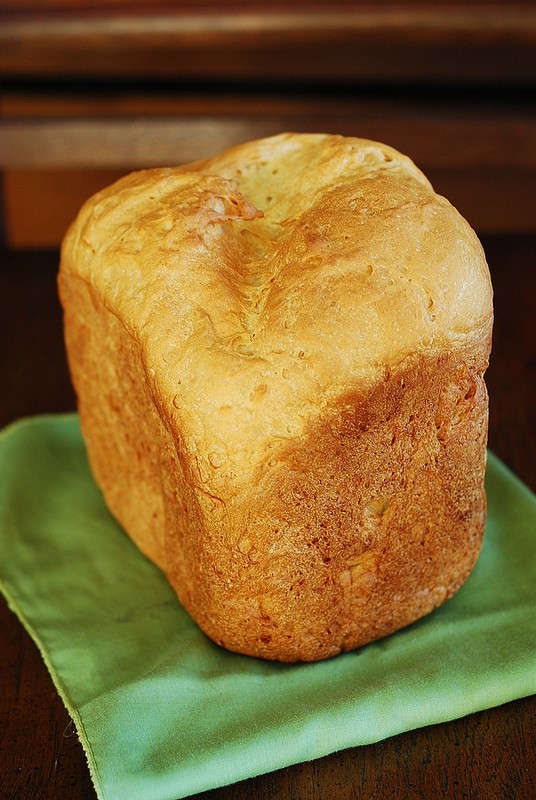
In the last 3 months I hardly bought any store-made bread, baking about a loaf every week at home, using bread machine recipes. And, I've noticed a couple of trends/issues when making bread: sometimes the bread comes out way too dense, or the loaf does not rise enough and, as a result, comes out even denser. So, here I will describe the homemade bread recipe that works for me to produce a less dense bread in a bread maker, using a basic cycle.
While making bread in a bread machine, make sure to consider these points:
- When you measure flour using cups, make sure not to pack flour too dense in a measuring cup, otherwise you will end up with much more flour than you need, and, therefore, the bread will come out denser. Measuring flour correctly will solve a lot of "dense" issues. The trick that works for me is that I use ⅓ measuring cup to carefully scoop all flour I need into the bread machine (usually about 3 cups), without over-packing it. Another way would be to weigh flour, which I don't do, but it's a solution.
- Use bread flour, not regular all-purpose flour for all bread machine recipes. Bread flour contains a higher percentage of gluten than regular all-purpose flour. Using bread flour will produce taller, less dense loaves. If you use all-purpose flour (which has smaller percentage of gluten than bread flour), your loaves will be flatter and denser.
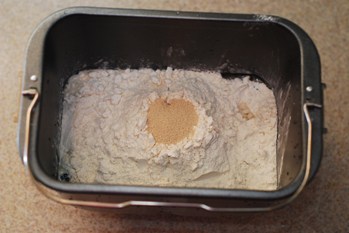
- When adding yeast, make sure you add it last, and add it on top of dry ingredients (flour). Make sure the yeast does not reach wet ingredients. Basically, make a small indentation on top of flour and add the yeast to the indentation, just like this:
And here is the simple white bread recipe. I started with the recipe that came in a little booklet together with my Williams-Sonoma bread machine, and I tweaked the ingredient measurements based on my preferences. It takes 10 minutes to prepare all ingredients together, and then it takes 3 hours and 15 minutes to bake the bread in a bread machine.
Bread Machine Recipe: How to make homemade white bread less dense
Ingredients
- 1 cup and 3 tablespoons water
- 2 tablespoons vegetable oil
- 1 ½ teaspoons salt
- 2 tablespoons sugar
- 3 ¼ cups white bread flour
- 2 teaspoons active dry yeast
Instructions
Important note about properly measuring flour using measuring cups:
- The proper way to measure flour using measuring cups is to aerate it first. This is done either by sifting flour, or aerating it by fluffing it up and whisking it well, then spooning it into the measuring cup, then carefully removing any excess flour with a knife. If you just stick that measuring cup in the bag of flour and scoop some out, you will get a lot more flour than what the recipe calls for. Do aerate the flour, or you will end up with dry dough!
How to make bread in a bread machine:
- Add water and oil into the bread pan. Add salt, sugar. Add flour.
- Make a small indentation on top of flour and make sure it does not reach wet ingredients. Add the yeast to the indentation.
- Keep yeast away from the salt.
- Insert the bread pan into the bread machine, press it down to snap. Close the lid.
- Use Basic bread, 1.5 lb loaf, medium crust cycle (3 hrs 15 minutes)
- When bread is done, remove the bread pan using oven mitts. Turn over the bread pan and shake it to release the loaf. Let the loaf cool on a wire rack for about 30 minutes.
Notes
- The recipe is adapted from Williams-Sonoma bread machine booklet.
- I have recently tweaked this recipe and made a delicious rustic Bread Machine Garlic & Herb Bread (with fresh rosemary and thyme) - worth checking out!
My Other Bread Recipes
Nutrition
Nutrition Disclaimer:
The nutritional information on this website is only an estimate and is provided for convenience and as a courtesy only. The accuracy of the nutritional information for any recipe on this site is not guaranteed. It should not be used as a substitute for a professional nutritionist's advice.

Followed the recipe exactly and it came out clumpy and falling apart.
I have been making bread bricks with my bread machine. Looked on the internet and found this web sight. Proceeded to follow it verbatim. Just made bread that looks as good as the picture on this site. Very happy with the results! Thank you
Thank you, Mark! So glad you tried this recipe and found it useful!
Great recipe, but your site is hard to take because of all the ads.
I made this bread to the letter and yet it came out tasting off. It tasted yeasty. Could it be the yeast? I used Bakipan instead of my usual Fleischmann's. What do you think??
Wow! Followed recipe exactly adding yeast dry and the loaf was better than store bought. Now for the turkey and gravy. Thanks for the recipe.
You are very welcome! Glad you liked the recipe!
I live in St. John's, Newfoundland, where we have been under a state of emergency ever since almost a meter of snow fell here a week ago. We were out of bread and couldn't go out to buy more, so I unearthed my old bread maker from the basement and tried this recipe, using the ingredients I had on hand. Turned out great! I didn't have any bread flour, only all-purpose, but the whisking really worked to lighten it (note - Canadian all-purpose flour also naturally contains more gluten than US flour). Also used extra virgin olive oil instead of veg oil, and instant yeast, which worked perfectly. Water temp was warm but not hot. I've made several more loaves since, all perfect, and will not be returning my machine to the basement! Thank you!
Janet, you are very welcome! I am glad that this recipe turned out to be useful during such a difficult time. Thank you for taking the time to share such a kind and thoughtful comment - I really appreciate it!
Just followed your recipe my read turned out great thank you
Glad you enjoyed the recipe!
Perfect followed recipe used 1LB BREAD FLOUR 3 ours 30 mins
Glad you liked the recipe!
Only had all purpose flour, still came out perfect. I can't wait to try it with bread flour. Thanks for sharing!!
You are very welcome! Good to know the recipe worked with the all-purpose flour.
I found your recipe and followed your instructions to the tee and my bread came out perfect! I had not used my bread maker for years ! Thank you for your help! Sincerely idie
So glad you tried this recipe, liked it, and left this wonderful comment on my site! 🙂
I was wondering what the temperature of the water should be when adding it into the breadmaker.
I can put cold water in my bread machine. It should say in the instructions.
room temperature
This works perfectly thank you I made the measurements into grams which I find more helpful for me. Bread is fantastic far superior to anything from a bread machine recipe book.
So glad you tried this recipe and found it useful!
First loaf of bread I have made in new bread maker. So light with a crunchy crust, absolutely delish and will be sticking to this recipe
Thank you! I am glad you liked this recipe.
Does this recipe adapt to most bread makers? I purchased mine from a local thrift store with no owners manual. I like your recipe but I am concerned if it will work in mine. Mine is a Hitachi HB-C103.
No doubt!
I’m not the author of this recipe, but I did purchase my machine at a thrift store, as well. As long as you’re using the 1.5 lb loaf setting, this recipe should work. I’ve used it several times, and it is wonderful. Honestly, it probably saved me from making some bad loaves because it so clearly explains things.
Thank you, Alexis, for such a thoughtful comment and feedback!
In the story you describe using 3 fills of your 1/3 measuring cup, but in the recipe you use 3 times a 1/4 cup.
As you mention getting the right amount is very important.
I just wanted to check, which is the correct one?
Thanks!
I think she was just saying that she scoops her flour out 1/3 cup at a time. The recipe calls for 3 and 1/4 cups of flour. So 9 scoops with the 1/3-cup measure, plus another 1/4 cup. That' how I understood it anyway. I used a 1-cup measure, gently filling with a spoon and leveling with a knife, and the bread turned out great.
She says an alternative to trying not to pack the flour too densely is to weigh it. Umm - it's the ONLY way to do it! Especially with recipes where quantities are sensitive. I've never understood the American obsession with measuring things by volume when it is weight that matters - especially for large quantities (i.e. above tsps and tbsps) - and density varies. Nobody on the other side of the Atlantic has a single clue what a 'cup' is supposed to be. Just how daft it is is illustrated by your water quantity in this recipe 'one cup and three tablespoons' and how accurately can one measure 1/4 of a cup (flour is 3 and 1/4 cups, apparently)? Why not say X fl ozs? (I'd say 'or millilitres' but asking for metric is certainly a step too far.)
Wow, Fred! Perhaps your system of measuring is better, but your common courtesy and manners leave a lot to be desired. Talk about condescending!
Susan, you explained it perfectly!