This post may contain affiliate links. Read my disclosure policy.
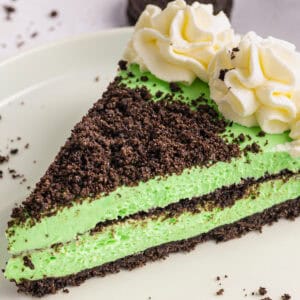
My no-bake Grasshopper Cheesecake is made with an Oreo cookie crust, a mint-flavored cream cheese filling, and a layer of Oreo crumbs tucked right in the middle. It sets in the fridge - no oven required - and comes together in 25 minutes.


The Coolest No-Bake Cheesecake for Spring Parties
This no-bake Grasshopper Cheesecake is the kind of dessert that disappears fast - just like my carrot cake cheesecake and blueberry cheesecake bars. Minty, creamy, and eye-catching in the best possible way, it's a crowd-pleaser for St. Patrick's Day, Easter, or any time you need a make-ahead dessert. With an Oreo crust, a minty cream cheese filling, and a hidden layer of cookie crumbs in the middle, we've got a winner!
I make this every year for St. Patrick's Day because the green color and mint-chocolate combo just make sense, and that pale mint green works perfectly for Easter too, with no adjustments. Let's get into it!

The Origins of Grasshopper Pie and Cheesecake
The "grasshopper" name originally comes from the Grasshopper cocktail, a classic American after-dinner drink made with creme de menthe, creme de cacao, and cream. The drink's distinctive pale green color and mint-chocolate flavor translated naturally into desserts, and grasshopper pie became a popular mid-20th-century American classic.
Traditional grasshopper pie is typically made with a chocolate cookie crust and a minty chiffon or cream filling, and often includes creme de menthe and creme de cacao for both flavor and the signature green color.
My cheesecake version is very similar to the classic grasshopper pie, but I use more accessible ingredients and make it family-friendly. I make an Oreo cookie crust similar to the one in my mocha cheesecake. I use mint extract instead of liqueur to keep it non-alcoholic, and green food coloring for that unmistakable fun green color.

You'll Need These Ingredients:
- 1 (13.29-ounce) package regular Oreos, about 33 cookies - You'll crush up all the cookies into crumbs then reserve some for the middle of the cheesecake and the topping.
- 5 tablespoons butter, melted - The shortening in the creme filling of the cookies will help keep the crumbs together, so you don't need too much butter. I used unsalted butter; salted butter can be used instead.
- 24 ounces cream cheese, softened - Make sure the cream cheese doesn't sit at room temperature for longer than 2 hours.
- 1 cup powdered sugar - This makes a softer cheesecake than if you used granulated sugar, and the cornstarch helps thicken the cheesecake.
- 1 teaspoon mint extract - Start with 1 teaspoon and add more to taste. Mint extract can be strong, so make sure you don't add too much or it will taste like toothpaste.
- ¼ teaspoon green food coloring, gel or liquid - I used off-brand food coloring from a small food color box from Target. You can omit the food coloring for a white cheesecake. To make it "boozy", use 2 teaspoons of creme de menthe instead of mint extract.
- 8 ounces whipped topping, thawed - I used Cool Whip.
- Whipped cream for topping, optional


How to Make Grasshopper Cheesecake (Step-by-Step Photos)
This is a recipe overview. Scroll down to find the complete instructions + ingredient amounts in the recipe card below.
- Grease a 9-inch springform pan.
- Pulse the Oreos into fine crumbs in a food processor. Reserve 1 cup, then blend in the melted butter until the mixture looks like wet sand.
")
- Press the crust firmly into the bottom of the pan and freeze it while you make the filling.
")
- Make the filling: Beat the cream cheese and powdered sugar until smooth, then mix in the mint extract and green food coloring until evenly tinted.
- Gently fold in the whipped topping.
")
- Spread half the filling over the crust, sprinkle with ½ cup Oreo crumbs, then top with the remaining filling and smooth the surface.
- Chill: Cover and refrigerate for at least 4 hours (or overnight) until set.
")
")
- Release: Run a knife around the edge, release the springform, and serve chilled.
- Decorate: Optionally, top the cheesecake with whipped cream rosettes and the remaining Oreo crumbs.

FAQ
Yes, and it's actually a more traditional grasshopper-style flavor. Replace the mint extract with 2 to 3 tablespoons of green creme de menthe. You can reduce or skip the green food coloring since the liqueur will tint the filling on its own. Keep in mind this makes the dessert alcohol-containing, so it's not suitable for kids.
Yes. Substitute the regular Oreos with a gluten-free chocolate sandwich cookie (like Glutino brand). Check that all other ingredients are gluten-free certified if you're making this for someone with celiac disease.

More Cheesecake Recipes
- No-Bake Ricotta Cheesecake
- Blueberry Cheesecake Bars
- Carrot Cake Cheesecake
- Salted Caramel Cheesecake
- Raspberry Cheesecake
- Mocha Cheesecake

Grasshopper Cheesecake
Ingredients
- 33 Oreo cookies (one 13.29-ounce package of regular Oreos)
- 5 tablespoons butter melted
- 24 ounces cream cheese softened
- 1 cup powdered sugar
- 1 teaspoon mint extract
- ¼ teaspoon green food coloring gel or liquid
- 8 ounces whipped topping thawed
- Whipped cream for topping optional
Instructions
- Prep the pan: Grease a 9-inch springform pan with butter or shortening, and set aside.
- Make the crust: Place the Oreo cookies in a food processor and pulse until finely crushed into crumbs. Reserve 1 cup of crumbs, then slowly pour in the melted butter while running the processor at low speed until the mixture resembles wet sand. Press the crumb mixture firmly and evenly into the bottom of the prepared springform pan. Freeze the crust while preparing the filling.
- Make the filling: In a large bowl using an electric mixer, beat the softened cream cheese and powdered sugar until smooth and creamy, about 2 minutes. Mix in mint extract and green food coloring until the color is uniform throughout. Fold in the whipped topping using a rubber spatula until fully incorporated, maintaining as much air as possible in the mixture.
- Assemble: Spoon half of the filling into the prepared crust and spread it out with an offset spatula. Sprinkle ½ cup of Oreo crumbs over the bottom layer of cheesecake filling. Carefully, spoon the remaining cheesecake filling over the crumbs, and smooth out the top. Cover with plastic wrap and refrigerate for at least 4 hours or overnight until firmly set.
- Decorate: Run a knife around the edge of the pan before releasing the springform. If desired, pipe whipped cream rosettes around the edge of the cheesecake, and top off the cheesecake with the remaining Oreo crumbs. Serve chilled.
Notes
- Go easy on the food coloring: Add a tiny bit at a time. Aim for "soft shamrock" green, not neon.
- Smooth texture: The cream cheese and powdered sugar need to be smooth before adding the food coloring and extract. You want a lump-free cheesecake.
- For a stronger mint flavor, add ½ teaspoon at a time. Mint extract can be strong, so you'll want to taste the cheesecake before adding more, and add it gradually.
- Press crust firmly: Use the flat bottom of a glass or measuring cup to press the crumbs firmly into the pan to keep the grasshopper cheesecake from falling apart when you slice it.
Storage Instructions
- Refrigerator: Cover the cheesecake with plastic wrap or store it in an airtight container in the refrigerator for up to 4 days.
- Freezer: Make sure the cheesecake is wrapped well in plastic wrap and foil and store it in the freezer for up to 2 months. Thaw overnight in the fridge before serving. For the best outcome, freeze before adding the Oreo crumbs on top or adding whipped cream.
You'll Need These Supplies
- 9-inch springform pan
- Food processor
- Large mixing bowl
- Electric mixer or stand mixer with a paddle attachment
- Offset spatula - Optional, but it helps with smoothing out the cheesecake.
Nutrition
Nutrition Disclaimer:
The nutritional information on this website is only an estimate and is provided for convenience and as a courtesy only. The accuracy of the nutritional information for any recipe on this site is not guaranteed. It should not be used as a substitute for a professional nutritionist's advice.


Submit your question or provide a review of the recipe + star rating RIGHT HERE.