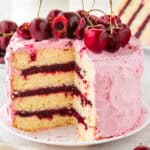
The Best Cherry Layer Cake (With Homemade Cherry Buttercream)
This Cherry Layer Cake features four soft vanilla cake layers filled with homemade fresh cherry filling and frosted with a silky cherry buttercream. Naturally pink — no food coloring! Works with fresh or frozen cherries.
Servings 12 slices
Calories 761kcal
Ingredients
Vanilla Cake
- 1 cup unsalted butter softened
- 2 cups granulated sugar
- 4 large eggs
- 1 tablespoon vanilla extract
- 2 ⅔ cups all-purpose flour
- 1 tablespoon baking powder
- ½ teaspoon salt
- 1 ½ cups whole milk
Cherry Filling
- 2 cups pitted cherries fresh or frozen
- ½ cup granulated sugar
- 2 tablespoons cornstarch
- 1 tablespoon lemon juice
- ¼ cup water
Cherry Buttercream
- 1 cup unsalted butter softened
- 4 cups powdered sugar
- ¼ cup cherry filling
- 1 teaspoon vanilla extract
Instructions
For the vanilla cake
- Preheat the oven to 350°F (175°C). Grease four 8-inch round cake pans.
- In a large mixing bowl, cream the butter and sugar until light and fluffy.
- Add the eggs one at a time, mixing well after each addition. Mix in the vanilla extract.
- In a separate bowl, whisk together the flour, baking powder, and salt.
- Gradually add the dry ingredients to the wet ingredients, alternating with the milk. Mix until just combined.
- Divide the batter evenly among the prepared pans. Smooth the tops with a spatula.
- Bake for 25-30 minutes, or until a toothpick inserted into the center comes out clean.
- Let the cakes cool in the pans for 10 minutes, then turn them out onto wire racks to cool completely.
For the cherry filling
- In a medium saucepan, combine the cherries, sugar, and lemon juice.
- In a small bowl, mix the cornstarch with water until smooth. Add this mixture to the saucepan.
- Cook over medium heat,crushing the cherries with a wooden spoon and stirring constantly, until the mixture thickens and starts to bubble (about 10 minutes).
- Remove from heat and let the filling cool completely before using.
For the cherry buttercream
- In a large bowl, beat the butter until creamy and fluffy.
- Gradually add powdered sugar, 1 cup at a time, mixing well after each addition.
- Add the cherry filling and vanilla extract. Beat on medium speed until smooth and fluffy.
To assemble
- Use a large serrated knife to remove the tops of the cakes and create an even surface.
- Place the first cake layer on a cake stand or plate. Spread a layer of cherry filling evenly across the top.
- Repeat with the second and third layer of filling.
- Place the final cake layer on top. Spread a thin crumb coat of cherry buttercream frosting over the entire cake. Chill for 30 minutes.
- Once the crumb coat is set, frost the cake with the remaining buttercream.
- Garnish with fresh cherries or decorative piping if desired.
Notes
- Fresh or frozen cherries both work here — if using frozen, add them straight to the saucepan without thawing.
- Make the cherry filling first. It needs to cool completely before it goes into the buttercream or between the cake layers, so give it a head start.
- Cool the cake layers completely before filling and stacking. Warm layers will melt the buttercream and cause the cherry filling to slide right out the sides. I promise the wait is worth it.
- Level your layers with a serrated knife. A slightly domed cake layer will make your finished cake lean. Trimming the tops flat keeps everything stacked evenly.
- Measure your cherry filling for the layers. Using a consistent amount between each layer (rather than eyeballing it) keeps the cake from leaning as you stack.
- Don't skip the crumb coat before adding the final layer of buttercream. This thin layer of buttercream traps the crumbs against the cake instead of letting them mix into your final frosting layer. Chilling it for 30 minutes before the final coat is what gives you that clean, bakery-style finish.
- Use a cake stand that turns. A rotating cake stand makes it so much easier to get an even coat of buttercream around the sides. You barely have to move your spatula; just turn the stand.
- Save some fresh cherries for garnish. A handful of fresh cherries on top (stems on, if you can find them) makes this cake look as good as it tastes, and it signals right away what flavor you're about to bite into.
Storage Instructions
- Room Temperature: Store leftover cake covered for up to 2 days.
- Refrigerator: Store covered in the fridge for up to 5 days; let slices come to room temperature before serving for the best texture.
- Freezer: Freeze unfrosted cake layers, wrapped tightly, for up to 3 months. Thaw overnight in the fridge before filling and frosting.
Nutrition
Calories: 761kcal | Carbohydrates: 111g | Protein: 7g | Fat: 34g | Saturated Fat: 21g | Polyunsaturated Fat: 2g | Monounsaturated Fat: 9g | Trans Fat: 1g | Cholesterol: 147mg | Sodium: 245mg | Potassium: 169mg | Fiber: 1g | Sugar: 85g | Vitamin A: 1110IU | Vitamin C: 2mg | Calcium: 124mg | Iron: 2mg