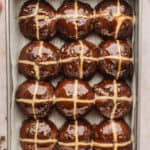
Chocolate Hot Cross Buns
These Chocolate Hot Cross Buns are a decadent twist on the classic Easter recipe, featuring rich chocolate dough and gooey chocolate chunks. Serve them warm for a festive breakfast or enjoy as an after-dinner dessert!
Servings 12 buns
Calories 306kcal
Ingredients
For the Buns
- 1 ¼ cups whole milk
- 3 ½ tablespoons butter
- 3 ¼ cups bread flour or all-purpose flour
- ⅓ cup dutch processed cocoa powder
- ⅓ cup white granulated sugar
- 1 teaspoon salt
- 2 ¼ teaspoons Instant yeast or fast action yeast
- 1 egg lightly beaten
- ½ cup semi-sweet chocolate chunks or chips
- ½ cup milk chocolate chunks or chips
For the Crosses
- 3 tablespoons all-purpose flour
- 2 tablespoons water
For Glazing
- 2 tablespoons honey
Instructions
Prepare the Dough
- In a medium sized saucepan heat the milk until steaming, but not boiling then add the butter. The milk will be hot enough that the butter melts into it. Mix together then set aside.
- In the large bowl of a stand mixer with the dough hook attachment fitted, add the flour, cocoa powder, sugar, salt and yeast. Hand mix with a whisk to combine.
- Check the temperature of the hot milk mixture (assuming it’s not too hot - see notes), pour the milk and lightly beaten egg into the mixing bowl then mix by hand to a rough shaggy dough.
- Turn the mixer on at its lowest speed and mix for 5 minutes. You should have a smooth and elastic dough. If kneading by hand do so on a lightly floured surface - this will take around 10 minutes.
- Tip in the chocolate chunks and mix again on the lowest speed for 2 minutes. The chocolate chunks will have mostly incorporated into the dough. If there are any loose ones or lots poking through the dough, work them into the dough by hand.
The First Rise
- Lightly oil a glass bowl and turn the dough out into it. Cover with cling wrap or a damp kitchen towel and leave somewhere warm to rise until doubled in size. This will take 1 to 1 ½ hours depending on the temperature.
- Prepare a 13” x 9” baking pan with parchment paper.
- When the dough has risen, turn it out onto a lightly floured surface and divide it into 12 equal sections.
The Second Rise
- Roll the sections of dough into ball shapes then place them in the baking pan with some space in-between. Cover the pan with cling wrap or a damp kitchen towel and leave to rise somewhere warm as before. This second rise will take 45 minutes to 1 hour depending on the temperature. After the second rise the buns will have puffed up and joined together.
Make the Crosses
- Preheat the oven to 375ºF.
- Add the flour and water to a small bowl and mix together until completely combined. The mixture should be the consistency of toothpaste. If it’s not, add a little more flour or water until you reach the desired consistency. Add to a piping bag with the end snipped off and carefully pipe crosses on top of each bun.
Bake
- Place the baking pan in the preheated oven on the middle rack. Bake for 20 minutes or until the buns are a dark brown and feel springy to the touch.
- Remove from the oven.
- Heat the honey in the microwave for 10-15 seconds.
- Using a pastry brush, coat the tops and sides of the buns with the honey while the buns are still warm.
Notes
- The milk temperature is key: The milk should be heated to around 110ºF. If you no thermometer is available, I like to do the finger dip test by putting my finger into the milk. If it feels hot but not so hot I can’t leave your finger in there it’s fine to use. If it’s too hot it will kill the yeast so if you’re not sure always err on the side of caution and wait for it to cool down before using.
- The equipment you need to mix and kneed the dough: For the initial mix of the dough to a “shaggy” dough use a danish whisk or your hands. Once you turn on your mixer to work the dough with the hook this will take 5 minutes but can also be done by hand and it will take around 10 minutes to achieve a smooth and elastic dough.
- First rise (proofing your dough): When it’s time to proof the dough (first rise) I recommend taking a photo of it in the bowl, that way you’ll be able to judge whether or not it’s doubled in size. You can do this rise in a proofing drawer which is the optimum temperature or if you don’t have one you can turn your oven on to 120ºF let it heat up then turn it off and put the dough in with the door closed.
- Dividing the dough into balls: You can eyeball this or if you have some scales you can weigh them. Opt for around 70g (2.5 ounces) each.
- How to shape the buns: To roll the dough into smooth balls, take a section and cup your hand over the top of it then using a medium firm pressure roll the dough on a work surface until it’s smooth and ball shaped.
- Tips for making and piping the crosses: The consistency for the mixture of the crosses is described in the recipe above. It should be thick enough that it doesn’t run when piped. Use a piping bag or squeeze bottle to pipe the crosses with as steady a hand as you can manage.
- Step-by-step photos: I provide super helpful step-by-step photos ABOVE this recipe card. If you need a visual reference, scroll up!
Nutrition
Calories: 306kcal | Carbohydrates: 45g | Protein: 8g | Fat: 11g | Saturated Fat: 6g | Polyunsaturated Fat: 1g | Monounsaturated Fat: 3g | Trans Fat: 0.1g | Cholesterol: 26mg | Sodium: 239mg | Potassium: 220mg | Fiber: 3g | Sugar: 15g | Vitamin A: 171IU | Vitamin C: 0.02mg | Calcium: 53mg | Iron: 2mg