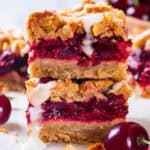
Cherry Pie Bars
These cherry pie bars have all the classic pie elements—juicy fruit filling made from scratch, buttery crust, and lemon glaze—baked in bar form for convenience. They’re easier than pie yet just as flavorful, rustic, elegant, and always perfect for sharing at potlucks, summer BBQs, or holiday gatherings.
Servings 12 bars
Calories 307kcal
Ingredients
Oat Crust and Topping
- 1 ½ cups all-purpose flour (180 grams)
- 1 ¼ cups old-fashioned rolled oats (125 grams)
- ½ cup light brown sugar (100 grams) packed
- ½ teaspoon baking powder (2 grams)
- ¼ teaspoon salt (1.5 grams)
- ¾ cup unsalted butter (170 grams) cold, cubed
- 1 large egg (50 grams)
Cherry Filling
- 3 cups pitted fresh sweet cherries (480 grams), if using frozen, do not thaw
- ⅓ cup light brown sugar (65 grams)
- 1 tablespoon lemon juice (15 milliliters)
- 1 teaspoon vanilla extract (5 milliliters)
- ¼ cup tapioca starch or cornstarch (30 grams)
Lemon Glaze
- 1 teaspoon lemon juice
- ½ cup powdered sugar (60 grams)
- 1 tablespoon milk or cream (15–30 milliliters)
Instructions
- Preheat your oven to 350°F (175°C). Line a 9 inch square pan with parchment paper or lightly grease it.
Make Cherry Filling
- In a medium saucepan, combine the sweet pitted cherries, brown sugar, lemon juice, and vanilla. Cook over medium heat for 3–4 minutes, stirring often, until the cherries start to release juice.
- Stir in the tapioca starch and cook for another 2–3 minutes, until the mixture thickens. Remove from heat and let cool slightly.
Make the Oat Crust
- Place the flour, oats, brown sugar, baking powder, and salt in a food processor. Pulse 3–4 times to combine.
- Add cold, cubed butter. Pulse until the mixture resembles coarse crumbs with small pea-sized bits.
- Crack the egg into a small bowl and beat lightly. Add it to the food processor and pulse just until the mixture starts to come together—it should still look crumbly but be cohesive when pressed.
- Remove 1 heaping cup (about 150 grams) of this mixture and set it aside for the topping.
Assemble & Bake
- Press the remaining crust mixture evenly and firmly into the bottom of the prepared pan.
- Spoon the cherry filling evenly over the crust.
- Sprinkle the reserved oat topping evenly over the cherries.
- Bake for 40–45 minutes or longer, until the top is lightly golden and the filling is bubbling at the edges.
- Let cool completely in the pan on a wire rack.
Make Lemon Glaze
- Add 1 teaspoon of lemon juice directly to the powdered sugar first and whisk together. Then whisk in 1 tablespoon of milk gradually. The sugar buffers the acidity, preventing curdling. If needed, add more milk a few drops at a time until a thick but pourable consistency forms.
Notes
- Can I use canned cherry pie filling instead of making the filling? Yes, but I recommend homemade—the texture and flavor are fresher. If using canned filling, reduce sugar in the crust slightly since canned filling is usually very sweet.
- How do I prevent soggy crust when using frozen cherries? Don’t thaw the cherries, and make sure to use enough starch (tapioca or cornstarch). Baking until the edges bubble also helps set the filling.
- Can I make these gluten-free? Yes—substitute a 1:1 gluten-free flour blend for the all-purpose flour, and make sure to use certified gluten-free oats. The texture will be slightly more crumbly but still delicious.
- Use a cherry pitter: A cherry pitter, which you can find on Amazon, is a huge time saver. It makes pitting a whole bag of cherries quick and easy.
Egg-Free Option:
Use a Flax Egg To replace the egg in the oat crust and topping. Here is how to do that: mix 1 tablespoon ground flaxseed with 2 ½ tablespoons water (7 grams flax + 37 milliliters water ). Stir well and let sit for 5–10 minutes until thick and gel-like Once it’s ready, add the flax egg to the food processor after pulsing in the butter (just like you would with a regular egg), and pulse to combine until the mixture clumps slightly when pressed.Storage, Reheating & Make-Ahead:
- Storage – Keep bars covered at room temperature for up to 2 days, or refrigerate for up to 5 days.
- Reheating – These bars taste great at room temp, but if you want them slightly warm, microwave for 10–15 seconds.
- Freezing – Wrap tightly in parchment and plastic wrap, then store in an airtight container for up to 2 months. Thaw overnight in the fridge.
- Make-Ahead – You can bake the bars a day in advance, glaze before serving, and they’ll still taste fresh. You can also make a cherry filling up to 2 days in advance.
Nutrition
Calories: 307kcal | Carbohydrates: 46g | Protein: 4g | Fat: 13g | Saturated Fat: 8g | Polyunsaturated Fat: 1g | Monounsaturated Fat: 3g | Trans Fat: 0.5g | Cholesterol: 46mg | Sodium: 79mg | Potassium: 158mg | Fiber: 2g | Sugar: 24g | Vitamin A: 401IU | Vitamin C: 3mg | Calcium: 41mg | Iron: 1mg