This post may contain affiliate links. Read my disclosure policy.
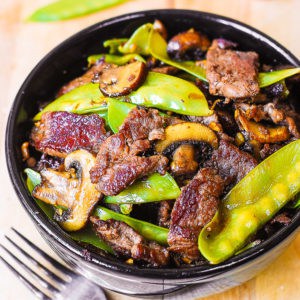
Asian Beef with Mushrooms and Snow Peas is a simple dinner perfect for those busy weeknights! Your family will love tender mushrooms, crisp snow peas, and thinly sliced sirloin steak sautéed with garlic.

This Asian Beef with Mushrooms and Snow Peas is a delicious and flavorful dinner to please everybody in the family! Snow peas and mushrooms are stir-fried together with beef and homemade Asian sauce. This recipe is gluten-free (if you use gluten-free Tamari sauce).
It is my new favorite homemade Asian dinner along with Asian salmon and noodles! All the ingredients go so well together in this recipe. Mushrooms and snow peas make a great combination with Asian beef.
Asian Beef
- Easy and quick. This simple dish is a perfect choice for a weeknight meal. Only 9 basic ingredients! Your family will love this recipe!
- Protein. You get plenty of protein in this dinner thanks to beef.
- Veggies. Snow peas taste amazing combined with Asian beef. You'll want seconds!
- Simple homemade Asian sauce. No need to use store-bought sauce. Make your own Asian sauce using just 5 basic ingredients: Tamari sauce, brown sugar, garlic, ginger, rice vinegar.

Recipe notes
- I'm using Tamari sauce to make a base for a stir fry sauce. Tamari is basically a gluten-free version of soy sauce, but regular soy sauce is much saltier than tamari.
- If you decide to use soy sauce in for Asian beef, keep in mind that it is much saltier than Tamari sauce. Use low-sodium soy sauce, or use less of soy sauce and more olive oil. Or, water down the sauce with a small amount of water.

Variations and Substitutions
- Beef. Use any type of boneless beef. Flank steak works great. Any other boneless parts of steak will work too.
- Vegetables. The lovely thing about this recipe is that you can use just about any vegetable. Use broccoli, asparagus, zucchini, green bell peppers, or snow peas. All these veggies will go great with Asian beef!
- Tamari sauce or soy sauce. You can use either. Keep in mind that Tamari sauce is usually gluten-free (look at the label). I prefer to use Tamari or low-sodium soy sauce.


What kind of beef to use
You can use pretty much any type of beef in this recipe as long as you slice it thinly:
- Flank steak
- Sirloin steak strips
- Any other kind of steak, or boneless beef.
How to thinly slice beef
I find it the easiest to thinly slice the beef while it's still partially frozen and thawed just briefly in the microwave. That keeps beef pretty solid and makes slicing the meat thinly a pretty easy task.

What to serve with Asian beef
- Rice. Serve white or brown rice. You can also serve jasmine rice or wild rice.
- Noodles. Serve long strand pasta such as spaghetti or fettuccine. You can also use angel hair pasta.
- Spicy Asian noodles with mushrooms and snow peas
- Asian noodle salad with peanut dressing
- Asian pasta with broccoli and mushrooms
Asian Beef with Mushrooms & Snow Peas
Ingredients
Homemade Asian Sauce:
- ½ cup tamari or low-sodium soy sauce
- 2 tablespoons brown sugar (add more to taste, up to 4 tablespoons)
- 6 garlic cloves minced
- ½ teaspoon ginger
- 2 teaspoons rice vinegar
Beef:
- 10 oz snow peas
- 4 tablespoons olive oil
- 10 oz mushrooms sliced thinly
- 1 pound beef thinly sliced (sirloin steak strips, flank steak, or any other steak)
Instructions
Prepare Asian sauce ingredients:
- Combine all the sauce ingredients in a bowl - whisk to combine. Set aside.
How to cook snow peas:
- Bring water in a medium pan to boil. Add snow peas, boil them for 5 minutes, drain. Set aside.
How to cook mushrooms:
- Heat a large skillet until hot, add 2 tablespoons olive oil - it should sizzle.
- Immediately add thinly sliced mushrooms - cook them on high heat, turning occasionally, until they brown nicely. Salt them midway, just a little bit. Do not add too much salt, as you will be adding tamari sauce later.
- Remove mushrooms to a bowl.
How to sear beef:
- To the same skillet, on high heat, add 2 tablespoons of olive oil, which will sizzle right away. Immediately add thinly sliced meat.
- Note: You might want to do this in 2 batches. You will want each slice of beef to touch the bottom of the skillet and for meat slices not to be crowded. This will ensure that beef will brown on high heat.
- Cook beef on one side until it browns nicely.
- Turn over all beef slices to the opposite side, and cook more, on high heat, until all slices brown nicely. Remove this batch to a bowl.
- Add the second batch of beef, and repeat.
Final assembly:
- Return all of the cooked beef slices back to the skillet.
- Add the snow peas and cooked mushrooms, then the Asian sauce.
- Stir everything to combine on high heat, for about 1 minute. Turn off heat. Cover the skillet with a lid.
Nutrition
Nutrition Disclaimer:
The nutritional information on this website is only an estimate and is provided for convenience and as a courtesy only. The accuracy of the nutritional information for any recipe on this site is not guaranteed. It should not be used as a substitute for a professional nutritionist’s advice.
Very good and pretty quick, but needed some adjustments. The first time I made as directed, and the soy sauce was just too dominant. This time I added 1/2 cup water, another 1 tsp rice vinegar (1 tbsp total), 1 tbsp cornstarch, and a good squeeze of sriracha. I also had fresh ginger so grated quite a bit of that. With the adjustments it’s a 4.5/5.
Way too much Tamari for 1 lb of steak. It came out super salty.
Hi Julia - I have made many of your recipes and this one is another winner! My husband and I loved it and he will enjoy taking the leftover for lunch. My only suggestion would be to add whether the ginger was to be ground or fresh. I used fresh. Thanks and I look forward to your email each week!
Thank you, Gail, for your awesome review! 🙂 I did use powdered ginger even though the fresh ginger is much better, of course! 🙂 Glad you both loved this dish! 🙂
The recipe looks and sounds wonderful but the sodium, is so high at 1707 ng is this per serving or for all 4?
Hi Karen! The estimated nutritional info is per 1 serving. To cut down on sodium in this one, try using low-sodium soy sauce or even coconut aminos as a swap. You can also reduce the overall amount of sauce a bit, and skip any added salt in the marinade. Toss in some fresh ginger, garlic, or a squeeze of lime to keep the flavor big without the salt. 🙂
Another great and easy recipe for a quick weeknight meal. I added half a chopped onion to mine and added while stir frying the mushrooms. If I were to do it again, I would add some cashews and Water chestnuts or bamboo shoots for the vegetable stir-frying step. Would really pop with some fresh chopped green onion on top.
I love the idea of adding cashews to this! I often add extra nuts even when I do a take-out - they add so much flavor and texture. And, I am so glad you enjoyed this meal, Kelly! 🙂
I really liked this recipe. I cooked the snap peas the way you suggested and they were too done for me, so next time I will just saute them in a little oil. I served it over rice
Hi Judy! Glad you liked it! Sautéing them sounds like a great plan for next time. 🙂
Everyone loved it. So good. I did add an onion and a red bell pepper to the mushrooms when they were almost done
So happy to hear that, Laila! 🙂 I love the addition of extra veggies - they are perfect! 🙂
I'm sure this is a great recipe as written, but out of necessity, I had to substitute a bit. I used leftover grilled ribeye and just shortened the time in the pan. I also had sugar snap peas instead of snow peas; I boiled them for about 3 minutes which was enough and they worked well. This was super easy and very good and will likely use it again and again. Based on others' comments, I did add a few crushed red pepper flakes (personal preference) and a frozen cube of minced ginger, but the recipe should work just great as is. Thanks!
p.s. I might add a bit of cornstarch to the sauce next time as it was a bit runny, but we thought the taste was great.
Hi Jan! love how you made this your own!! ❤️ Leftover ribeye + sugar snap peas = genius swaps!! So happy you loved the flavor and plan to make it again and again!! 🙂
Love this recipe. So easy and full of flavor. Have made it numerous times. My one tip is to be careful when cooking your beef, not to overcook it.
Julia, I saw this, loved the ingredients and thought stir-fry. I added red bell pepper because I love it and the red added nicely to the color. Turned this out in my wok. Thanks for a great idea.
Great recipe! Used fresh grated ginger. Added red pepper & red onion. Added a cornstarch slurry & a little water. Added red pepper flakes. Served with a rice mixed with cauliflower rice. EXCELLENT!!!
This dish was wonderful. My family really enjoyed it. Thank you for sharing.
I am so happy to hear that, Barb! 🙂
Need to thicken the sauce with flour and not cook the snap peas for 5 mins. I added them at the last minute and cooked for a minute and covered—let them cook that way to have a crunch. And l, I will make more sauce next time. Will add scallions and water chestnuts as well.
I love your changes and recommendations - very helpful!
Made it for my husband and he loved it! Cut back on the sugar and added green onions. Served over rice. Restaurant quality recipe and I’ll make it again and again. Thank you for sharing!
Love the green onion addition—that sounds SO good. 🙂 Thanks for your sweet words and for trying the recipe, Veronica! 🙂
Fresh ginger or ground ginger??
Ground ginger!
We really enjoyed this meal. Since I was using Truvia Sweet Complete brown sugar I cut it back to 1 T. Based on others comments, I added a few onion chunks and 1/2 tsp chili paste with garlic. I served it over brown rice. We will definitely be enjoying this meal at least once a month.
Hi, Donna, I am so glad you enjoyed this dish and that it made it to your monthly rotation - I am honored and flattered. 🙂 Thank you for taking the time to share this amazing review! 🙂